剪藏
Rethinking your position
Learn how to learn
3R编码 | nestjs最佳实践 - 课程概览
3R编码 | Node.js开发环境搭建
3R编码 | Nestjs+Eslint+SWC应用初始化及断点调试
3R编码 | 装饰器与反射
3R编码 | Nestjs核心概念
3R编码 | 无懈可击的Linux服务器构建
3R编码 | 使用Turborepo+pnpm workspaces构建monorepo应用
3R编码 | 使用Gitea+Drone自建CICD平台
3R编码 | 整合Typeorm实现CRUD
3R编码 | 请求数据的验证和响应数据的序列化
3R编码 | 数据关联与树形嵌套结构的分类和评论的实现
3R编码 | 自定义全局的验证管道,拦截器和过滤器
3R编码 | 自定义数据验证约束及约束中的依赖注入
3R编码 | 批量操作及软删除(回收站)功能使用
3R编码 | 数据库与MeiliSearch的全文搜索
3R编码 | 数据操作代码的抽象化
3R编码 | 整合bun与pm2实现开发环境与生产环境免编译和自启
3R编码 | 自建配置系统实现
3R编码 | 嵌套路由与Swagger文档实现
3R编码 | 使用Yargs构建命令行工具
3R编码 | 生产环境下静默启动以及PM2 API的使用
3R编码 | 数据迁移功能的实现
3R编码 | 数据填充命令实现
3R编码 | 用户模块开发以及使用Passport实现JWT认证和无痛刷新
3R编码 | 基于CASL的RBAC动态角色及权限系统实现
3R编码 | 模型动态关联与基于CASL的动态权限的实现
3R编码 | 使用BullMQ实现异步验证短信与邮件发送
3R编码 | WebSocket实现消息广播功能
3R编码 | chapter27
3R编码 | chapter28
3R编码 | TS全栈+AI开发实战 - 课程概览
3R编码 | Node.js环境搭建及应用初始化
3R编码 | Next.js应用初始化
3R编码 | React内置Hooks的使用与自定义详解
3R编码 | Next.js中使用Zustand进行状态管理详解
3R编码 | Next.js核心概念及应用构建
微电子学第1话 MOS Differential Pair (I)
微电子学第1话 MOS Differential Pair (I)
微电子学第3话 CMRR
微电子学第2话 MOS Differential Pair (II)
终于有人讲了,凭什么三极管能放大?
降低人类负担:类型系统即边界
固态变压器SST是什么
本站点使用 MrDoc 构建
-
+
3R编码 | Next.js中使用Zustand进行状态管理详解
前面我们已经学习了使用`contenxt`、`useReducer`等进行状态管理。但是这种方法略显麻烦,而且对代码感官和应用性能并不友好。所以,这节课,我们尝试使用更简洁好用的[zustand](https://github.com/pmndrs/zustand)进行状态管理。 React状态管理库的生态比较杂,不像vue那么统一。大致可以分为以下几个流派 - flux类型:最传统和标准的react状态管理流派。以[redux](https://cn.redux.js.org/)、[redux-toolkit](https://redux-toolkit.js.org/)、[rematch](https://rematchjs.org/)、[zustand](https://github.com/pmndrs/zustand)为代表 - proxy类型:类似vue中的状态管理工具。以[mobx](https://mobx.js.org/README.html)、[valtio](https://github.com/pmndrs/valtio)为代表 - 原子状态:一种比较新的状态管理方案。以[recoil](https://recoiljs.org/)、[jotai](https://jotai.org/)为代表 站长个人比较喜欢轻量又简洁的[zustand](https://github.com/pmndrs/zustand),所以我们的课程就用它作为状态管理工具。**请在学习本节课之前务必先粗略阅读[zustand的官方文档](https://docs.pmnd.rs/zustand/getting-started/introduction)**,如果童鞋们自己有兴趣也可以学习对比一下其他的状态管理库 ### 课程目标[](#课程目标 "课程目标的直接链接") 本节课的目标如下 - 学会zustand的常用方法,并在next.js中使用zustand进行状态管理 - 掌握zustand的一些常用中间件 - 学会如何封装zustand状态库 - 学习如何使用zustand实现动态主题切换 ### 技术概念[](#技术概念 "技术概念的直接链接") 以下为本节课所涉及的技术概念 - [react官方关于状态管理的解释](https://zh-hans.react.dev/learn/managing-state) - [zustand](https://github.com/pmndrs/zustand):轻量级react状态管理工具 - [utility-types](https://github.com/piotrwitek/utility-types): 一个第三方的ts类型包,包含了大量原本需要自己写的常用自定义类型 ### 前置准备[](#前置准备 "前置准备的直接链接") 安装以下依赖 ``` pnpm add zustand utility-types deepmerge ``` zustand非常简单易用,我们来学习一下他的基本用法和一些工具 这部分我们尝试利用状态管理实现不同的Antd布局风格 有以下几种 - `top`: 菜单栏在顶栏 - `side`: 菜单栏在侧边栏,LOGO也在侧边栏 - `content`: 菜单栏在侧边栏,LOGO在顶栏 同时动态切换颜色,但是顶栏和侧边栏保持不同颜色。当顶栏或者侧边栏深色时,另一个是浅色 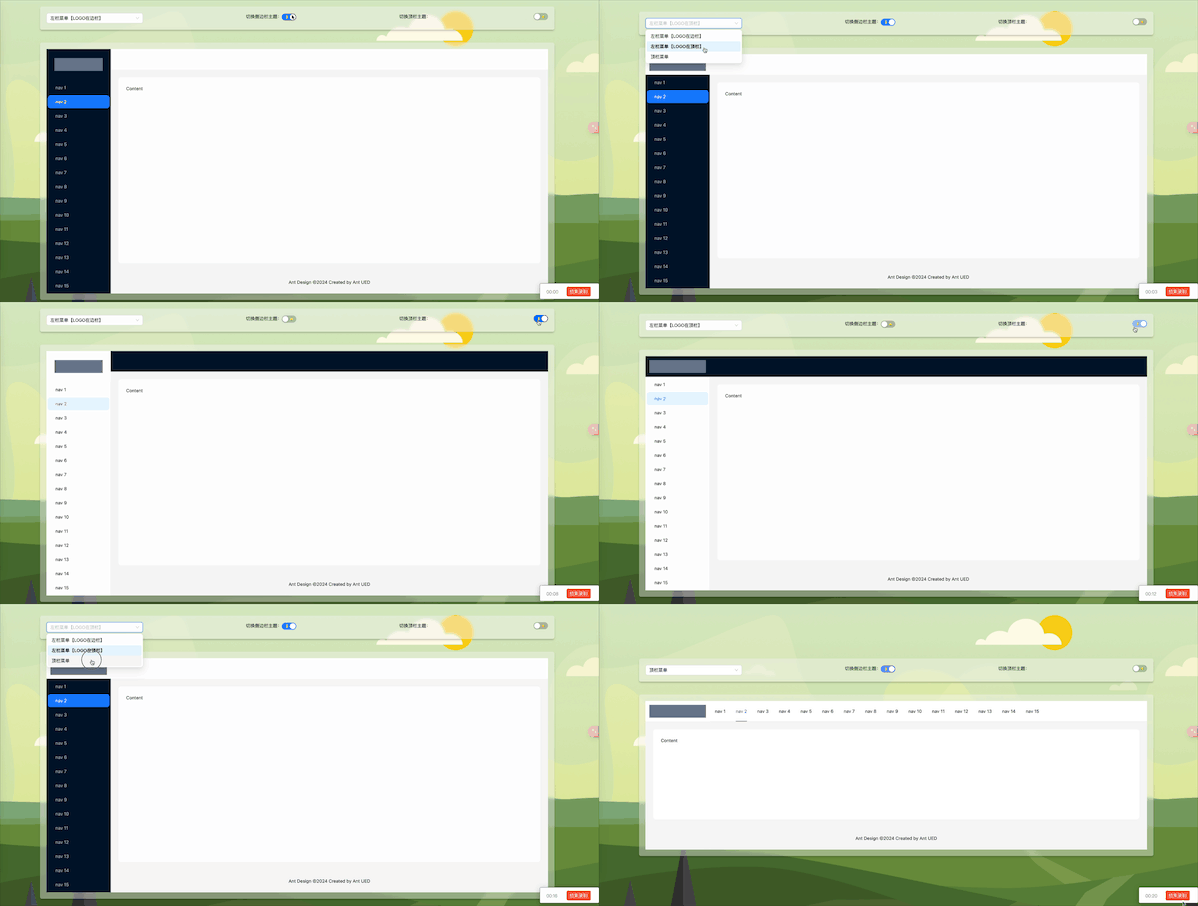 编写代码前,先定义以下枚举常量和类型 ``` // src/demo/_components/zustand/constants.ts/** * 布局模式 */export enum LayoutMode { /** 只有顶栏导航 */ TOP = 'top', /** 侧边导航,顶栏自定义 */ SIDE = 'side', /** 同side,但是LOGO在顶栏 */ CONTENT = 'content',}/** * 布局组件 */export enum LayoutComponent { /** 顶栏 */ HEADER = 'header', /** 侧边栏 */ SIDEBAR = 'sidebar',}export enum LayoutActionType { /** 更改布局模式 */ CHANGE_MODE = 'change_mode', /** 更改组件主题 */ CHANGE_THEME = 'change_theme',}// src/app/demo/_components/zustand/types.tsimport type { LayoutComponent, LayoutMode } from './constants';/** * 主题颜色模式 */export enum ThemeMode { LIGHT = 'light', DARK = 'dark',}/** * 布局配置 */export interface LayoutOptions { /** 布局模式 */ mode: `${LayoutMode}`; /** 布局组件主题色 */ theme: Partial<LayoutTheme>;}export interface LayoutActions { /** 更改布局模式 */ changeMode: (value: `${LayoutMode}`) => void; /** 更改主题 */ changeTheme: (value: Partial<LayoutTheme>) => void;}/** * 布局组件主题色 */export type LayoutTheme = { [key in `${LayoutComponent}`]: `${ThemeMode}` }; ``` ### 基本用法[](#基本用法 "基本用法的直接链接") 使用zustand创建一个状态池 ``` // src/app/demo/_components/zustand/store.ts'use client';import { isNil } from 'lodash';import { create } from 'zustand';import type { LayoutActions, LayoutOptions, ThemeMode } from './types';/** * 状态池创建函数 */const createLayoutStore = () => create<LayoutOptions & LayoutActions>()((set) => ({ mode: 'side', theme: { header: 'light', sidebar: 'dark', }, changeMode: (value) => set(() => ({ mode: value })), changeTheme: (value) => set((state) => { let { sidebar } = state.theme; // 当同时传入sidebar和header时,去除header,以sidebar为准 if (!isNil(value.sidebar)) sidebar = value.sidebar; // 当只传入header时,设置header else if (!isNil(value.header)) sidebar = value.header === 'light' ? 'dark' : 'light'; // 使header和sidebar样式相反 const header: `${ThemeMode}` = sidebar === 'light' ? 'dark' : 'light'; return { theme: { sidebar, header } }; }), }));/** * 创建布局状态池 */export const useLayoutStore = createLayoutStore(); ``` 然后使用该状态池动态切换布局和顶栏及侧边栏颜色 信息 ``` // src/app/demo/_components/zustand/index.tsx'use client';import { Layout as AntdLayout, Menu as AntdMenu, Select, Switch, theme } from 'antd';import { default as AntdSider } from 'antd/es/layout/Sider';import { Content as AntdContent, Footer as AntdFooter, Header as AntdHeader,} from 'antd/es/layout/layout';import clsx from 'clsx';import { FC, useCallback } from 'react';import $styles from '../style.module.css';import { LayoutMode } from './constants';import { useLayoutStore } from './store';/** * 生成一些菜单数据 */const items = new Array(15).fill(null).map((_, index) => ({ key: index + 1, label: `nav ${index + 1}`,}));/** * 菜单组件 */const Menu: FC = () => { const mode = useLayoutStore((state) => state.mode); const layoutTheme = useLayoutStore((state) => state.theme); return ( <AntdMenu // 当顶栏菜单时,菜单颜色跟随header,否则跟随sidebar theme={mode === 'top' ? layoutTheme.header : layoutTheme.sidebar} mode={mode === 'top' ? 'horizontal' : 'inline'} defaultSelectedKeys={['2']} items={items} style={{ flex: 1, minWidth: 0 }} /> );};/** * 侧边栏组件 */const Sider: FC = () => { const mode = useLayoutStore((state) => state.mode); const layoutTheme = useLayoutStore((state) => state.theme); const { // colorBgContainer 就是白色 token: { colorBgContainer }, } = theme.useToken(); return ( <AntdSider style={{ background: layoutTheme.sidebar === 'dark' ? '' : colorBgContainer }}> {mode === 'side' && ( <div className="bg-slate-500 w-3/4 h-10 mx-auto my-7" /> )} <Menu /> </AntdSider> );};const Header: FC = () => { const layoutTheme = useLayoutStore((state) => state.theme); const { token: { colorBgContainer }, } = theme.useToken(); const mode = useLayoutStore((state) => state.mode); return ( <AntdHeader style={{ background: layoutTheme.header === 'dark' ? '' : colorBgContainer }} className="flex items-center px-0" > {mode !== 'side' && <div className="bg-slate-500 w-44 h-10 mx-3" />} {mode === 'top' && <Menu />} </AntdHeader> );};/** * 内容组件 */const Content: FC = () => { const { token: { colorBgContainer, borderRadiusLG }, } = theme.useToken(); return ( <AntdLayout className="p-6"> <AntdContent style={{ padding: 24, margin: 0, minHeight: 280, background: colorBgContainer, borderRadius: borderRadiusLG, }} > Content </AntdContent> </AntdLayout> );};/** * 底部组件 */const Footer: FC = () => ( <AntdFooter style={{ textAlign: 'center' }}> Ant Design ©{new Date().getFullYear()} Created by Ant UED </AntdFooter>);/** * 布局模式控制组件 */const ModeCtrol: FC = () => { const mode = useLayoutStore((state) => state.mode); const changeMode = useLayoutStore((state) => state.changeMode); return ( <Select defaultValue={mode} style={{ width: 300 }} onChange={changeMode}> <Select.Option value={LayoutMode.SIDE}>左栏菜单【LOGO在边栏】</Select.Option> <Select.Option value={LayoutMode.CONTENT}>左栏菜单【LOGO在顶栏】</Select.Option> <Select.Option value={LayoutMode.TOP}>顶栏菜单</Select.Option> </Select> );};/** * 顶栏和侧边栏控制组件 */const ThemeCtrol: FC = () => { const { header, sidebar } = useLayoutStore((state) => state.theme); const changeTheme = useLayoutStore((state) => state.changeTheme); const changeSidebarTheme = useCallback( (value: boolean) => changeTheme({ sidebar: value ? 'dark' : 'light' }), [], ); const changeHeaderTheme = useCallback( (value: boolean) => changeTheme({ header: value ? 'dark' : 'light' }), [], ); return ( <> <div> <span>切换侧边栏主题:</span> <Switch checkedChildren="🌛" unCheckedChildren="☀️" onChange={changeSidebarTheme} checked={sidebar === 'dark'} defaultChecked={sidebar === 'dark'} /> </div> <div> <span>切换顶栏主题:</span> <Switch checkedChildren="🌛" unCheckedChildren="☀️" onChange={changeHeaderTheme} checked={header === 'dark'} defaultChecked={header === 'dark'} /> </div> </> );};/** * 布局组件 */export const ZustandDemo: FC = () => { const mode = useLayoutStore((state) => state.mode); return ( <div className="flex flex-auto justify-center items-center flex-col"> <div className={clsx($styles.container, 'w-[100rem] flex justify-between')}> <ModeCtrol /> <ThemeCtrol /> </div> <div className={clsx($styles.container, 'w-[100rem]')}> <AntdLayout> {mode !== 'side' && <Header />} {mode === 'side' && <Sider />} <AntdLayout> {mode === 'side' && <Header />} {mode === 'content' && <Sider />} {mode !== 'content' && <Content />} {mode !== 'content' && <Footer />} {mode === 'content' && ( <AntdLayout> <Content /> <Footer /> </AntdLayout> )} </AntdLayout> </AntdLayout> </div> </div> );}; ``` 导入根组件并运行`pnpm dev`测试效果 ``` // src/app/demo/page.tsx// ...const DemoPage: FC = () => ( <div className={$styles.demo}> <ZustandDemo /> </div>);export default DemoPage; ``` 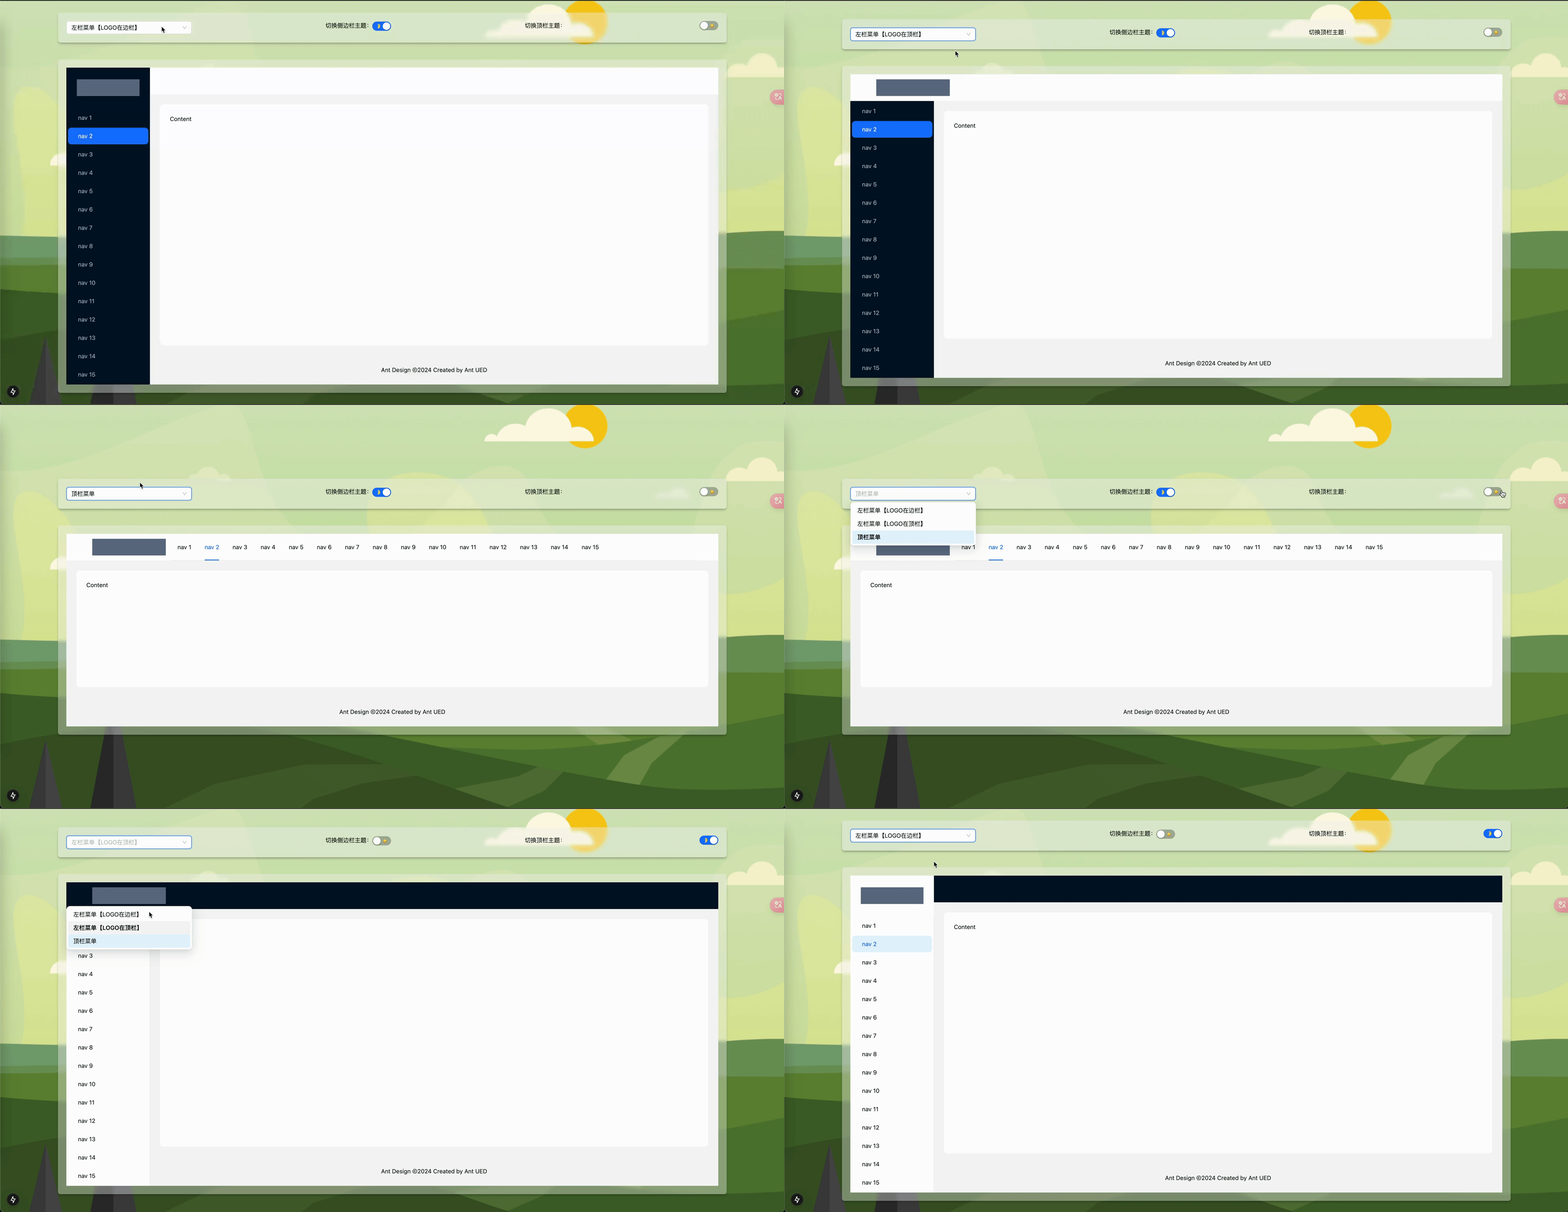 ### immer中间件[](#immer中间件 "immer中间件的直接链接") zustand自带immer中间件,直接可以使用 ``` // src/app/demo/_components/zustand/store.ts// ...import { immer } from 'zustand/middleware/immer';/** * 状态池创建函数 */const createLayoutStore = () => create<LayoutOptions & LayoutActions>()( immer((set) => ({ // ... changeTheme: (value) => set((state) => { if (!isNil(value.sidebar)) { state.theme.sidebar = value.sidebar; state.theme.header = state.theme.sidebar === 'light' ? 'dark' : 'light'; } else if (!isNil(value.header)) { state.theme.header = value.header; state.theme.sidebar = state.theme.header === 'light' ? 'dark' : 'light'; } }), })), ); ``` ### 防止重复渲染[](#防止重复渲染 "防止重复渲染的直接链接") 如果需要直接从状态中拿多个对象会造成重复渲染,我们可以使用`useShallow`解决。例如 ``` // src/app/demo/_components/zustand/index.tsx// ...const Sider: FC = () => { const { mode, theme: { sidebar }, } = useLayoutStore(useShallow((state) => ({ mode: state.mode, theme: state.theme }))); const { // colorBgContainer 就是白色 token: { colorBgContainer }, } = theme.useToken(); return ( <AntdSider style={{ background: sidebar === 'dark' ? '' : colorBgContainer }}> {mode === 'side' && ( <div className="bg-slate-500 w-3/4 h-10 mx-auto my-7" /> )} <Menu /> </AntdSider> );}; ``` ### 存储数据[](#存储数据 "存储数据的直接链接") 可以使用`persist`中间件,把状态中某些数据存储在"localstorage"里面。那么在重新打开或刷新页面时还会保持设定的状态 ``` // src/app/demo/_components/zustand/store.ts// ...const createLayoutStore = () => create<LayoutOptions & LayoutActions>()( immer( persist( (set) => ({ // ... }), { name: 'zustand-demo', }, ), ), ); ``` 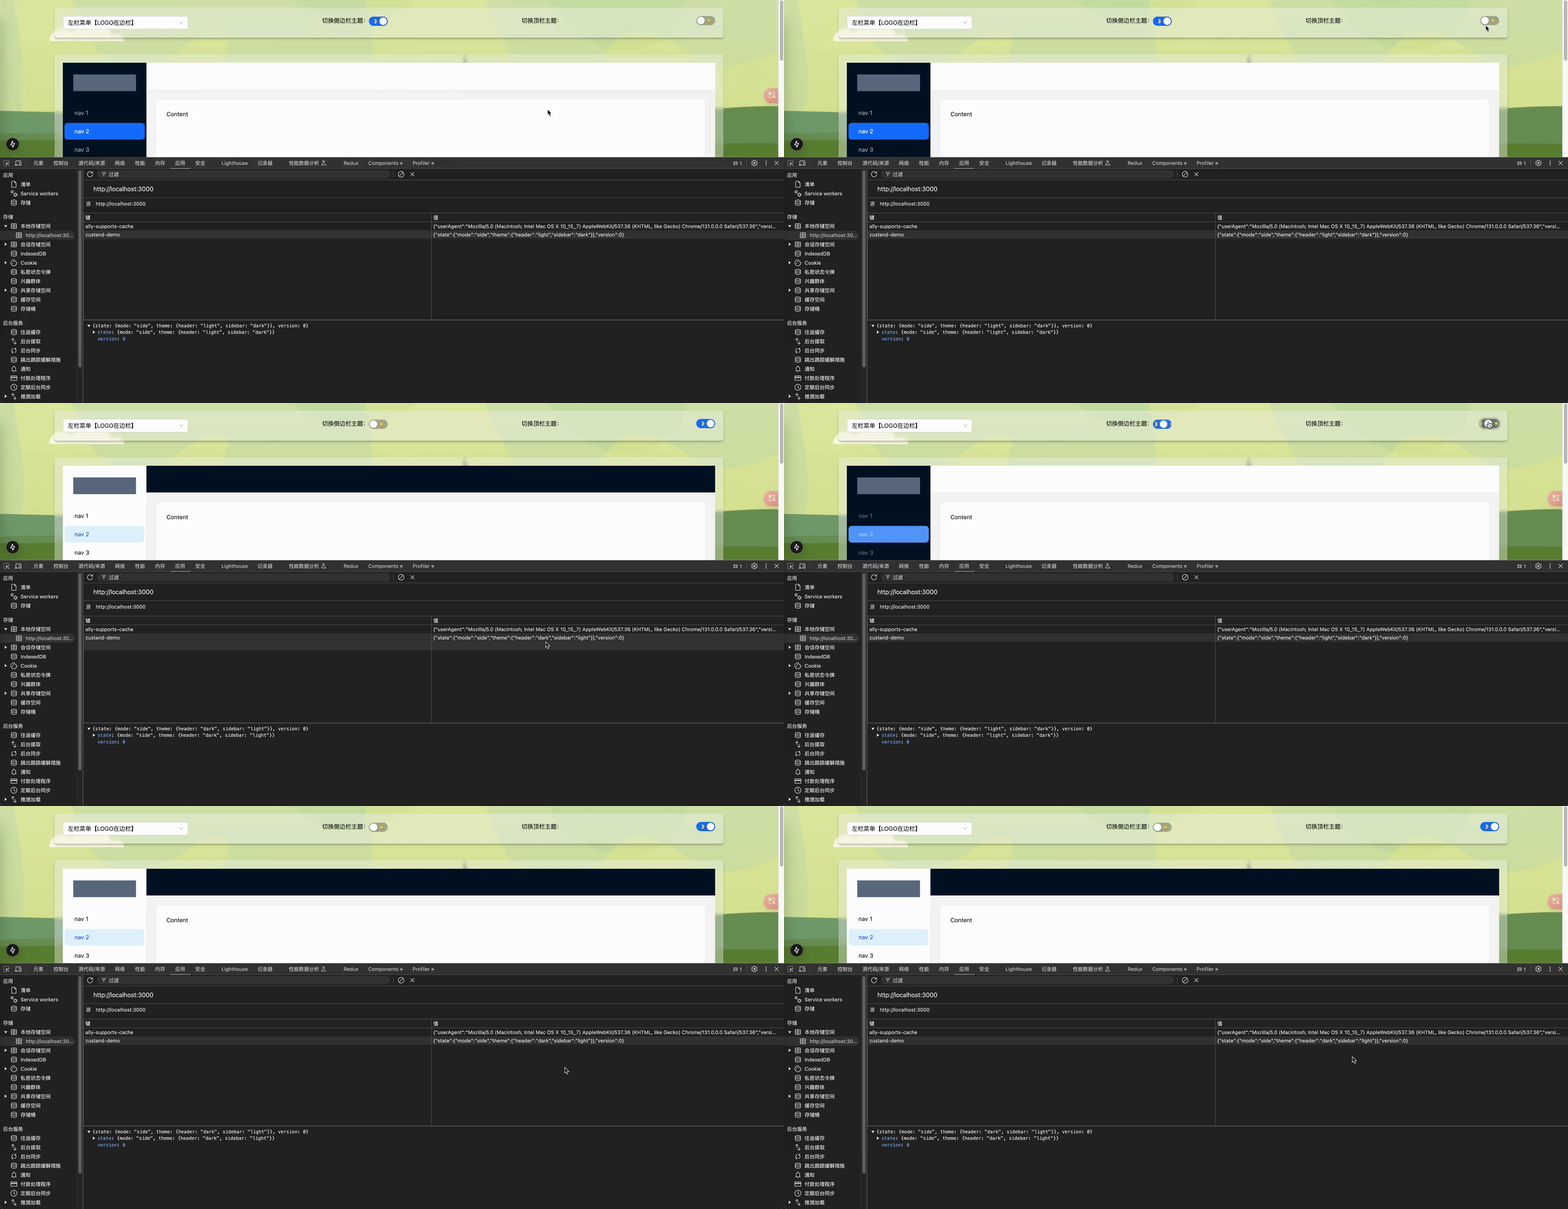 ### devtools中间件[](#devtools中间件 "devtools中间件的直接链接") 使用devtools中间件可以像redux一样记录状态的操作和查看当前状态(需要在chrome商店中自行安装[Redux DevTools](https://chromewebstore.google.com/detail/redux-devtools/lmhkpmbekcpmknklioeibfkpmmfibljd?pli=1)) success 默认是匿名操作,你也可以为每个操作命名。具体查看[这里](https://github.com/pmndrs/zustand?tab=readme-ov-file#logging-actions) ``` // src/app/demo/_components/zustand/store.ts// ...const createLayoutStore = () => create<LayoutOptions & LayoutActions>()( immer( devtools( persist( (set) => ({ //... }), { name: 'zustand-demo', }, ), { name: 'zustandDemo' }, ), ), ); ``` 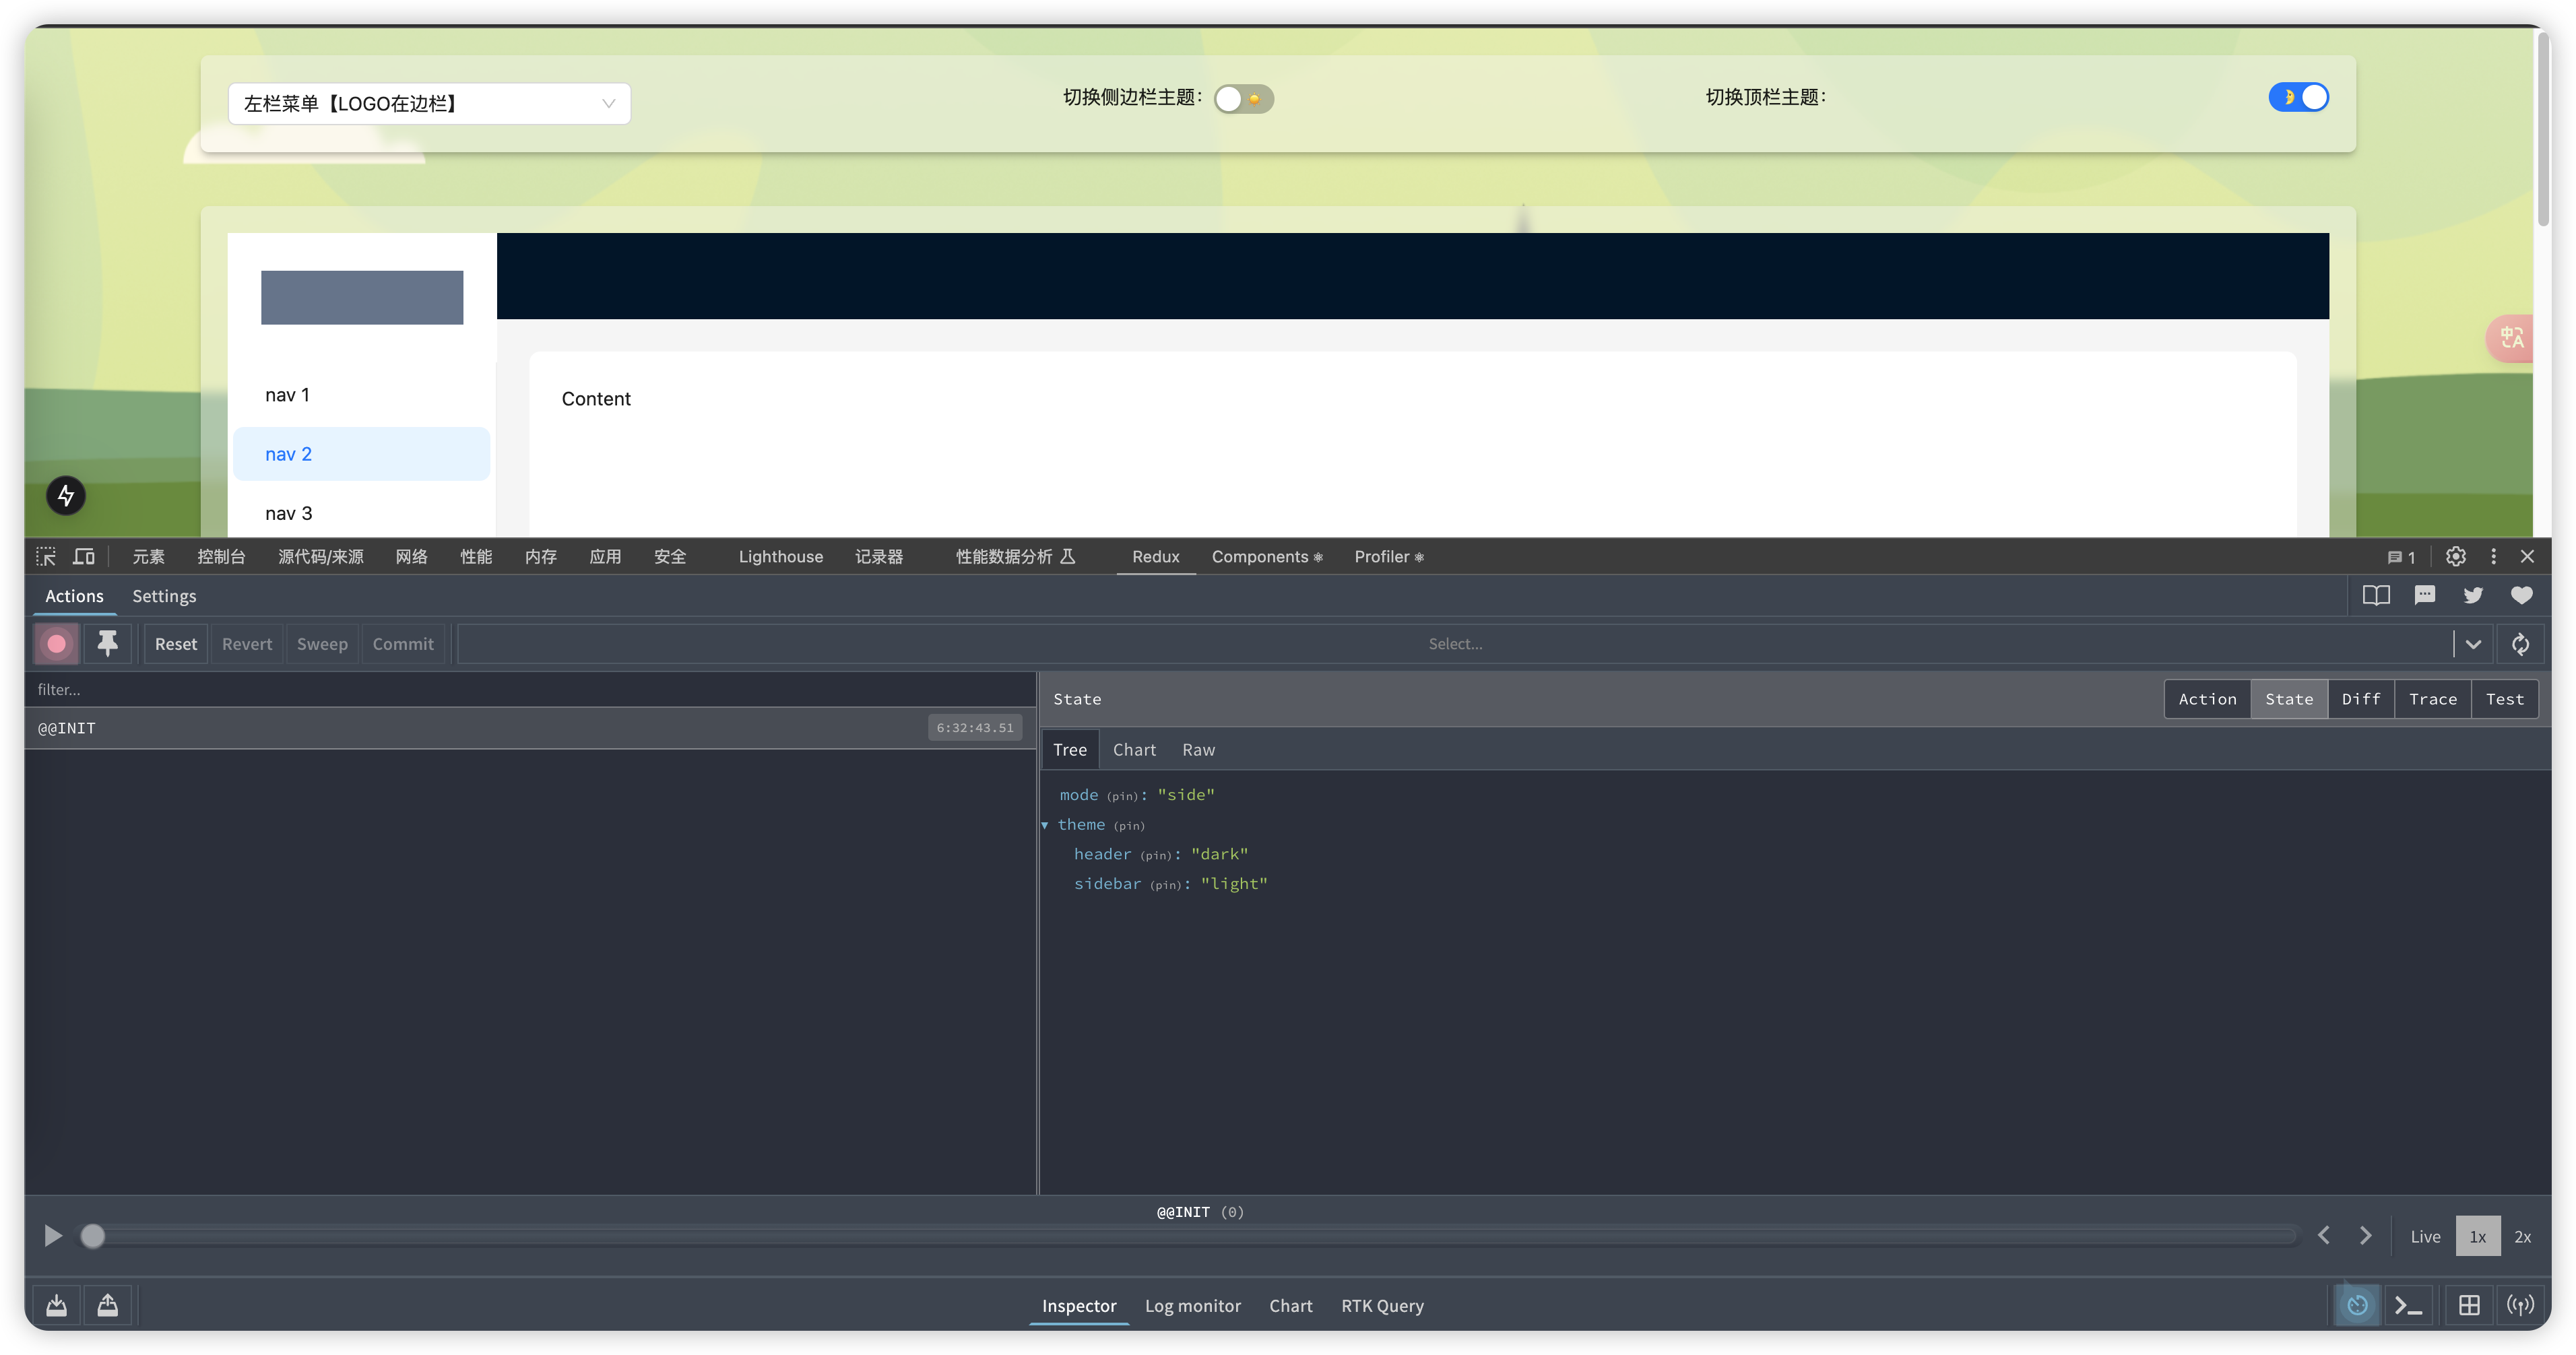 ### 状态订阅[](#状态订阅 "状态订阅的直接链接") 使用`subscribeWithSelector`中间件可以订阅状态的更改 ``` // src/app/demo/_components/zustand/store.ts// ...const createLayoutStore = () => create<LayoutOptions & LayoutActions>()( subscribeWithSelector( immer( devtools( persist( // ... }), { name: 'zustand-demo', }, ), { name: 'zustandDemo' }, ), ), ), );const useLayoutStore = createLayoutStore();useLayoutStore.subscribe( (state) => state.theme, (value) => { console.log(value); },);export { useLayoutStore }; ``` 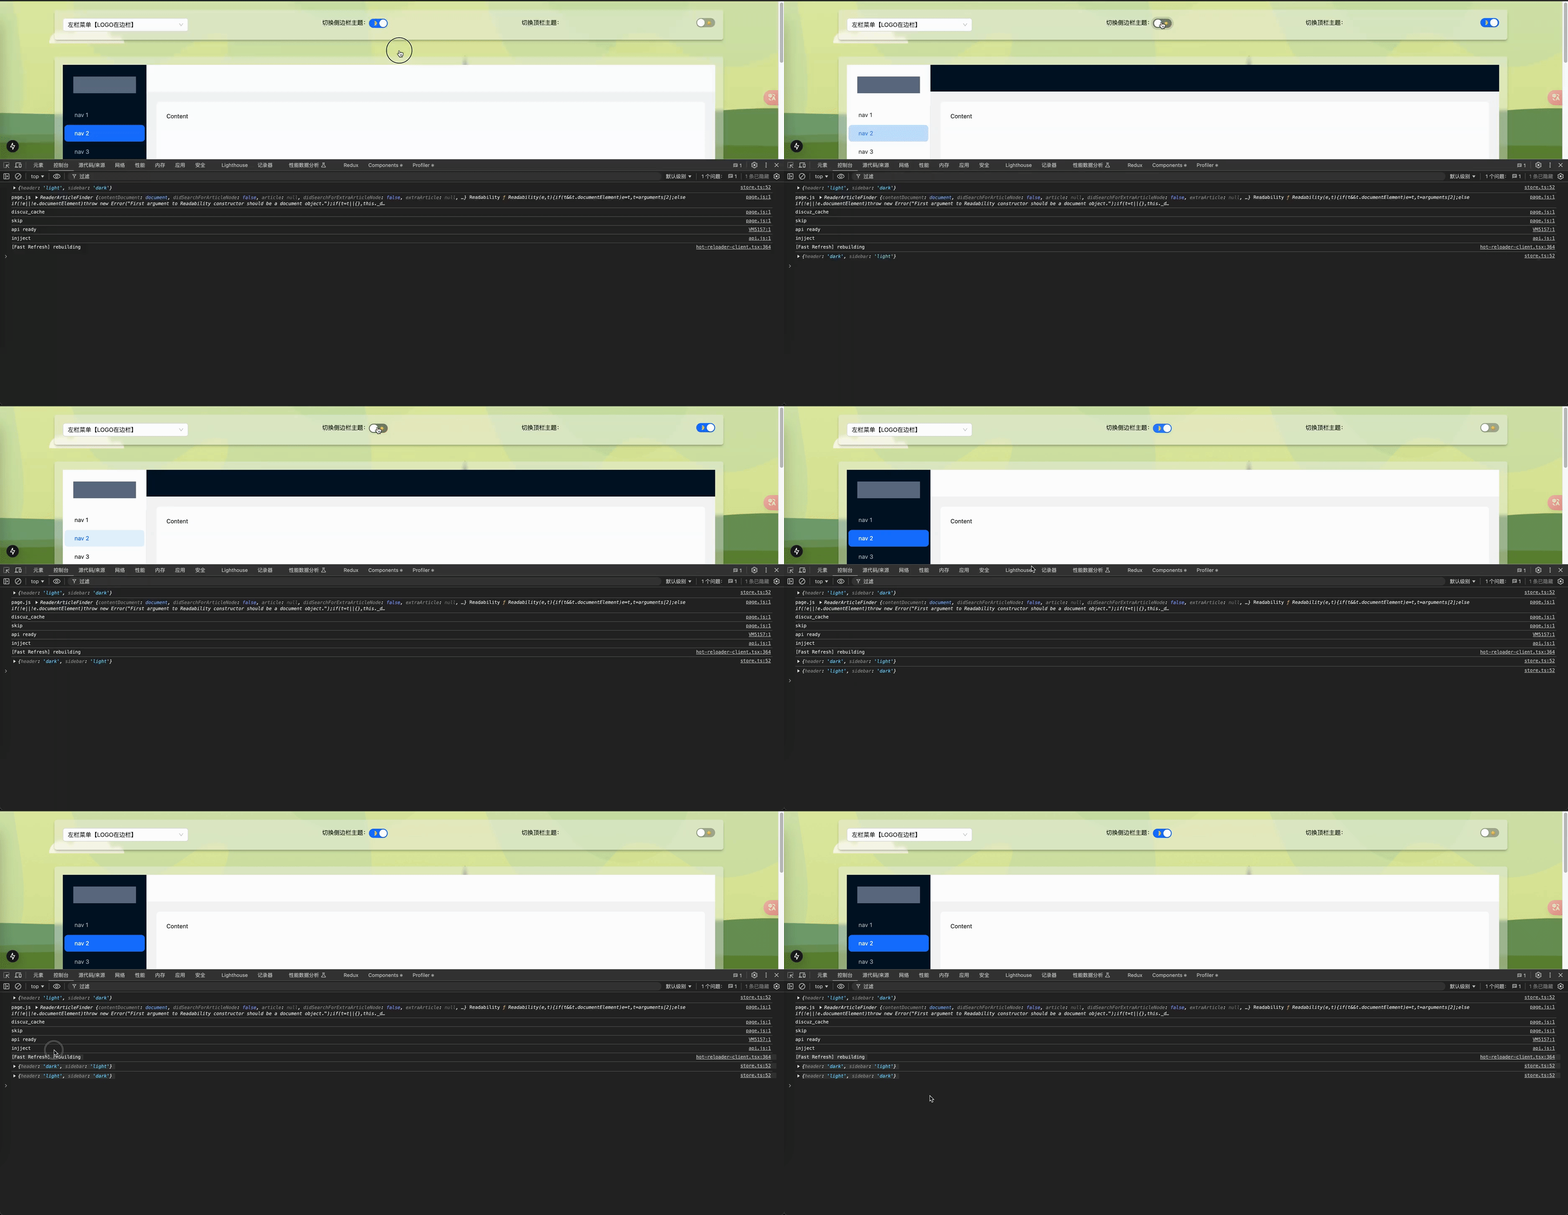 也可以在第一次渲染组件时就触发订阅,同时加上对象深度对比 ``` // src/app/demo/_components/zustand/store.ts// ...import { shallow } from 'zustand/shallow';useLayoutStore.subscribe( (state) => state.theme, (value) => { console.log(value); }, { equalityFn: shallow, fireImmediately: true, },); ``` 我们还可以用`subscribe`的返回值,在某个时机取消订阅 ``` const unSubLayout = useLayoutStore.subscribe( // ...);unSubLayout(); ``` ### 其它特性[](#其它特性 "其它特性的直接链接") zustand有着非常多的玩法,比如`redux`(下面部分用到)等,上面部分讲述了一些基本的用法。详细可以去看它的[源码仓库](https://github.com/pmndrs/zustand)和[官网文档](https://docs.pmnd.rs/zustand/getting-started/introduction) 在next.js中,我们需要使用`Context`把状态提升到顶级变成全局状态,这是因为 - 对于zustand这种原子化状态管理库来说,next.js每个路由(页面)中状态无法很好的共享 - SSR机制导致前端页面和服务器直出页面在水合后,前端页面对状态往往会多次重复渲染 首先,给`html`标签加上`suppressHydrationWarning` ``` // src/app/layout.tsx// ...const RootLayout: FC<PropsWithChildren> = ({ children }) => ( <html lang="en" suppressHydrationWarning> <body>{children}</body> </html>); ``` 有时候,我们需要在外部包装组件中传入一些自定义的状态值。所以编写一个包装组件 基于`deepmerge`库编写一个自定义的快速对象深度合并函数 ``` // src/libs/utils.tsimport deepmerge from 'deepmerge';/** * 深度合并对象 * @param x 初始值 * @param y 新值 * @param arrayMode 对于数组采取的策略,`replace`为直接替换,`merge`为合并数组 */export const deepMerge = <T1, T2>( x: Partial<T1>, y: Partial<T2>, arrayMode: 'replace' | 'merge' = 'merge',) => { const options: deepmerge.Options = {}; if (arrayMode === 'replace') { options.arrayMerge = (_d, s, _o) => s; } else if (arrayMode === 'merge') { options.arrayMerge = (_d, s, _o) => Array.from(new Set([..._d, ...s])); } return deepmerge(x, y, options) as T2 extends T1 ? T1 : T1 & T2;}; ``` 删除前面的布局创建 ``` /** * 创建布局状态池 */// const useLayoutStore = createLayoutStore();// useLayoutStore.subscribe(// (state) => state.theme,// (value, _) => {// console.log(value);// },// {// equalityFn: shallow,// fireImmediately: true,// },// );// export { useLayoutStore }; ``` 添加一个状态类型 ``` // src/app/demo/_components/zustand/types.ts/** * 布局全部状态类型 */export type LayoutState = LayoutOptions & LayoutActions; ``` 使用`createStore`替换`create`创建状态以获得存储对象本身而不是一个hooks,然后传入自定义参数并深度合并自定义参数 ``` // src/app/demo/_components/zustand/store.ts//...export const createLayoutStore = (options: DeepPartial<LayoutOptions> = {}) => createStore<LayoutState>()( subscribeWithSelector( immer( devtools( persist( (set) => ({ ...deepMerge<LayoutOptions, DeepPartial<LayoutOptions>>( { mode: 'side', theme: { header: 'light', sidebar: 'dark', }, }, options, 'replace', ), changeMode: (value) => set(() => ({ mode: value })), changeTheme: (value) => set((state) => { if (!isNil(value.sidebar)) { state.theme.sidebar = value.sidebar; state.theme.header = state.theme.sidebar === 'light' ? 'dark' : 'light'; } else if (!isNil(value.header)) { state.theme.header = value.header; state.theme.sidebar = state.theme.header === 'light' ? 'dark' : 'light'; } }), }), { name: 'zustand-demo', }, ), { name: 'zustandDemo' }, ), ), ), ); ``` 添加一个状态池类型 ``` // src/app/demo/_components/zustand/types.ts/** * 布局状态池类型 */export type LayoutStoreType = ReturnType<typeof createLayoutStore>; ``` 添加一个`Context` ``` // src/app/demo/_components/zustand/constants.ts// .../** * 状态上下文包装器 */export const LayoutContext = createContext<LayoutStoreType | null>(null); ``` 创建一个`Context`包装组件,并把它包装在根组件中 ``` // src/app/demo/_components/zustand/index.tsx// .../** * 状态池包装器 * @param param0 */export const LayoutStore: FC<PropsWithChildren<DeepPartial<LayoutOptions>>> = ({ children, ...props}) => { const storeRef = useRef<LayoutStoreType>(null); if (isNil(storeRef.current)) { storeRef.current = createLayoutStore(props); } return <LayoutContext value={storeRef.current}>{children}</LayoutContext>;};// src/app/demo/layout.tsxconst DemoLayout: FC<PropsWithChildren> = ({ children }) => ( <LayoutStore> <AntdRegistry> <Locale> <Theme> <DemoAntd>{children}</DemoAntd> </Theme> </Locale> </AntdRegistry> </LayoutStore>);export default DemoLayout; ``` 添加一个用于通过`Context`获取状态的hooks ``` // src/app/demo/_components/zustand/hooks.ts// .../** * 状态选择器 * @param selector */export function useLayoutContext<T>(selector: (state: LayoutState) => T): T { const store = use(LayoutContext); if (!store) throw new Error('Missing LayoutContext in the tree'); return useStore(store, useShallow(selector));} ``` 现在需要修改所有组件中的状态获取方式,例如 ``` // src/app/demo/_components/zustand/index.tsx// ...const Header: FC = () => { const mode = useLayoutContext((s) => s.mode); const { header } = useLayoutContext((s) => ({ ...s.theme })); const { token: { colorBgContainer }, } = theme.useToken(); return ( <AntdHeader style={{ background: header === 'dark' ? '' : colorBgContainer }} className="flex items-center px-0" > {mode !== 'side' && <div className="mx-3 h-10 w-44 bg-slate-500" />} {mode === 'top' && <Menu />} </AntdHeader> );}; ``` 这样就可以在任何页面中使用布局设置的状态了 为了更方便快捷地使用zustand创建状态,我们对其进行一定的封装。 所有创建函数都包含了`immer`、`subscribeWithSelector`、`devtools`这几个中间件。`createReduxStore`和`createPersistReduxStore`用于创建"redux"状态池。`createPersistStore`和`createPersistReduxStore`包含了`persist`中间件。 ``` // src/libs/store.tsimport type { StateCreator } from 'zustand';import type { DevtoolsOptions, PersistOptions } from 'zustand/middleware';import { createStore as createStoreFunction } from 'zustand';import { devtools, persist, redux, subscribeWithSelector } from 'zustand/middleware';import { immer } from 'zustand/middleware/immer';/** * 创建包含订阅,immer以及devtoools功能的普通状态商店 * @param creator * @param devtoolsOptions */export const createStore = <T extends object>( creator: StateCreator< T, [ ['zustand/subscribeWithSelector', never], ['zustand/immer', never], ['zustand/devtools', never], ] >, devtoolsOptions?: DevtoolsOptions,) => { return createStoreFunction<T>()( subscribeWithSelector(immer(devtools(creator, devtoolsOptions))), );};/** * 创建包含订阅,immer以及devtoools功能的普通状态商店 * 同时支持自动存储到客户端,默认存储到localstorage * @param creator * @param persistOptions * @param devtoolsOptions */export const createPersistStore = <T extends object, P = T>( creator: StateCreator< T, [ ['zustand/subscribeWithSelector', never], ['zustand/immer', never], ['zustand/devtools', never], ['zustand/persist', P], ] >, persistOptions: PersistOptions<T, P>, devtoolsOptions?: DevtoolsOptions,) => { return createStoreFunction<T>()( subscribeWithSelector( immer(devtools(persist(creator as unknown as any, persistOptions), devtoolsOptions)), ), );};/** * 创建包含订阅,immer以及devtoools功能的reducer状态商店 * 同时支持自动存储到客户端,默认存储到localstorage * @param reducer * @param initialState * @param devtoolsOptions */export const createReduxStore = < T extends object, A extends { type: string; },>( reducer: (state: T, action: A) => T, initialState: T, devtoolsOptions?: DevtoolsOptions,) => createStoreFunction( subscribeWithSelector(immer(devtools(redux(reducer, initialState), devtoolsOptions))), );/** * 创建包含订阅,immer以及devtoools功能的reducer状态商店 * @param reducer * @param initialState * @param persistOptions * @param devtoolsOptions */export const createPersistReduxStore = < T extends object, A extends { type: string; }, P = T,>( reducer: (state: T, action: A) => T, initialState: T, persistOptions: PersistOptions<T, P>, devtoolsOptions?: DevtoolsOptions,) => createStoreFunction( subscribeWithSelector( immer( devtools( persist(redux(reducer, initialState), persistOptions as any), devtoolsOptions, ), ), ), ); ``` 另外,使用[auto-zustand-selectors-hook](https://github.com/Albert-Gao/auto-zustand-selectors-hook),让我们可以像hooks一样去读取状态,有兴趣可参考其[仓库](https://github.com/Albert-Gao/auto-zustand-selectors-hook)。 下面我们改造前面的动态主题切换方案,使用[zustand](https://github.com/pmndrs/zustand)去实现。但与前面课程不同的是,本次我们添加了 - 根据系统默认主题切换明暗的新模式 - 出了antd外,为shadcn也添加一个明暗主题切换功能 创建以下文件结构 ``` src/components/theme├── constants.ts # 常量├── hooks.ts # hooks├── index.tsx # 包装组件├── store.ts # 状态池└── types.ts # 类型 ``` 我们使用[zustand](https://github.com/pmndrs/zustand)+`redux`中间件+`Context`实现该组件 ### 常量及类型[](#常量及类型 "常量及类型的直接链接") 除了增加系统主题模式外,其它基本都是从`src/demo/reducer.tsx`复制过来改的 ``` // src/app/_components/theme/constants.ts/** * 主题模式 */export enum ThemeMode { LIGHT = 'light', DARK = 'dark', SYSTEM = 'system',}/** * 主题操作类型 */export enum ThemeActions { // 切换主题黑亮 CHANGE_MODE = 'change_mode', // 反转主题黑亮 TOOGLE_MODE = 'toggle_mode', // 切换紧凑主题 CHANGE_COMPACT = 'change_compact', // 反转紧凑主题 TOOGLE_COMPACT = 'toggle_compact',}/** * 默认配置 */export const defaultThemeOptions: ThemeOptions = { mode: 'system', compact: false,};// src/app/_components/theme/types.ts/** * 状态类型 */export interface ThemeOptions { mode: `${ThemeMode}`; compact: boolean;}/** * Redux dispatch */export type ThemeDispatchs = | { type: `${ThemeActions.CHANGE_MODE}`; value: `${ThemeMode}` } | { type: `${ThemeActions.TOOGLE_MODE}` } | { type: `${ThemeActions.CHANGE_COMPACT}`; value: boolean } | { type: `${ThemeActions.TOOGLE_COMPACT}` };/** * 状态参数 */export type ThemeState = ThemeOptions & { dispatch: (action: ThemeDispatchs) => ThemeDispatchs;}; ``` ### 状态池[](#状态池 "状态池的直接链接") 创建的状状态池并通过`theme`键存储到localstorage中 success `getSystemTheme`这个函数在下面编写,此处先略过 ``` // src/app/_components/theme/store.ts// .../** * 创建reducer */const ThemeReducer: Reducer<ThemeOptions, ThemeDispatchs> = produce((draft, action) => { switch (action.type) { case 'change_mode': draft.mode = action.value; break; case 'toggle_mode': if (draft.mode === 'system') { draft.mode = getSystemTheme() === 'dark' ? 'light' : 'dark'; } else { draft.mode = draft.mode === 'dark' ? 'light' : 'dark'; } break; case 'change_compact': draft.compact = action.value; break; case 'toggle_compact': draft.compact = !draft.compact; break; default: break; }});/** * 状态池创建函数 */export const createThemeStore = (options: Partial<ThemeOptions> = {}) => createPersistReduxStore( ThemeReducer, { ...defaultThemeOptions, ...options }, { name: 'theme', partialize: (state) => ({ mode: state.mode, compact: state.compact }), }, );// src/app/_components/theme/types.ts/** * 状态池类型 */export type ThemeStoreType = ReturnType<typeof createThemeStore>; ``` ### 状态使用[](#状态使用 "状态使用的直接链接") `Context`和`Provider`的创建与上面的demo类似 ``` // src/app/_components/theme/constants.ts// .../** * 创建用于全局共享的状态Context */export const ThemeContext = createContext<ThemeStoreType | null>(null);// src/app/_components/theme/index.tsx'use client';// ...const Theme: FC<PropsWithChildren<Partial<ThemeOptions>>> = ({ children, ...props }) => { const storeRef = useRef<ThemeStoreType>(null); if (!storeRef.current) { storeRef.current = createThemeStore(props); } return <ThemeContext value={storeRef.current}>{children}</ThemeContext>;};export default Theme; ``` 添加一个用于获取状态的hooks ``` // src/app/_components/theme/hooks.ts'use client';// .../** * 获取整个状态池对象 */export function useThemeStore() { const store = use(ThemeContext); if (!store) throw new Error('Missing Theme Component in the tree'); return store;}/** * 获取主题状态 * @param selector */export function useThemeState<T>(selector: (state: ThemeState) => T): T { const store = useThemeStore(); return useStore(store, useShallow(selector));} ``` 编写一个用于获取操作系统主题的钩子,在第一次打开页面时,用户没有手动设置主题状态并存储于`localstorage`,、这时候默认使用系统主题 其中,系统主题通过`window.matchMedia('(prefers-color-scheme: dark)').matches`获取 备注 `useThemeColor`写不写无所谓,因为本节课用不到 ``` // src/app/_components/theme/utils.ts/** * 获取系统当前主题 */export const getSystemTheme = () => { if (typeof window === 'undefined') return 'light'; const isDarkTheme = window.matchMedia('(prefers-color-scheme: dark)').matches; return isDarkTheme ? 'dark' : 'light';};// src/app/_components/theme/hooks.ts// .../** * 获取主题模式状态 */export const useTheme = () => useThemeState((state) => ({ mode: state.mode, compact: state.compact }));/** * 获取主题操作函数 */export const useThemeActions = () => { const dispatch = useThemeState((state) => state.dispatch); return { changeMode: useCallback( // 防抖限制,防止快速操作 debounce((v: `${ThemeMode}`) => dispatch({ type: 'change_mode', value: v }), 100, {}), [], ), toggleMode: useCallback( debounce(() => dispatch({ type: 'toggle_mode' }), 100, {}), [], ), changeCompact: useCallback( (v: boolean) => dispatch({ type: 'change_compact', value: v }), [], ), toggleCompact: useCallback(() => dispatch({ type: 'toggle_compact' }), []), };};/** * 获取系统主题颜色 */export const useSystemTheme = (): 'dark' | 'light' => { const [isDarkTheme, setIsDarkTheme] = useState(() => getSystemTheme()); useEffect(() => { const setSystemDark = () => setIsDarkTheme(getSystemTheme()); window.addEventListener('change', setSystemDark); return () => { window.removeEventListener('change', setSystemDark); }; }, []); return isDarkTheme ? 'dark' : 'light';};/** * 获取主题最终颜色 */export const useThemeColor = () => { const { mode } = useTheme(); const systemTheme = useSystemTheme(); return mode === 'system' ? systemTheme : mode;}; ``` 为了切换主题时,更改tailwind所需的`html`的`class`,我们需要制作一个子组件。该组件订阅暗黑模式,在模式改变时,切换`html`的`class`。在`mode`是`system`,也就是系统默认主题时,则根据系统主题是否为`dark`来确认`html`应该添加的类 ``` // src/app/_components/theme/index.tsx// ...const ThemeSubscriber: FC<PropsWithChildren> = ({ children }) => { const systemTheme = useSystemTheme(); const store = useThemeStore(); let unSub: () => void; useEffect(() => { unSub = store.subscribe( (state) => state.mode, (m) => { const html = document.getElementsByTagName('html'); if (html.length) { html[0].classList.remove('light'); html[0].classList.remove('dark'); if (m === 'system') html[0].classList.add(systemTheme); else html[0].classList.add(m === 'dark' ? 'dark' : 'light'); } }, { fireImmediately: true, }, ); return () => { if (!isNil(unSub)) unSub(); }; }, [systemTheme]); return <>{children}</>;};const Theme: FC<PropsWithChildren<Partial<ThemeOptions>>> = ({ children, ...props }) => { // ... return ( <ThemeContext value={storeRef.current}> <ThemeSubscriber>{children}</ThemeSubscriber> </ThemeContext> );}export default Theme; ``` ### 切换Antd[](#切换antd "切换Antd的直接链接") 编写设置组件,用于切换Antd的明暗和紧凑皮肤 先写一个钩子,通过主题状态获取Antd黑暗和紧凑皮肤的算法 ``` // src/app/_components/theme/hooks.ts// .../** * 获取 Antd 主题配置算法 */export const useAntdAlgorithm = () => { const { mode, compact } = useTheme(); const systemTheme = useSystemTheme(); return useMemo(() => { const result = [compact ? theme.compactAlgorithm : theme.defaultAlgorithm]; if (mode === 'dark' || (mode === 'system' && systemTheme === 'dark')) result.push(theme.darkAlgorithm); return result; }, [systemTheme, mode, compact]);}; ``` 编写选择器组件代码如下 备注 暂时我们没有添加系统主题选择器选项(等会儿我们在前台shadcn皮肤中添加),Antd选择器我们只做明亮和黑暗选择即可。所以,等一下测试的时候,我们把`localstorage`里面的主题状态删除 ``` // src/app/_components/theme/setting.tsx'use client';// .../** * Antd主题选择器 */export const AntdThemeSetting: FC = () => { const { mode, compact } = useTheme(); const { toggleMode, toggleCompact } = useThemeActions(); return ( <> <Switch checkedChildren="🌛" unCheckedChildren="☀️" onChange={toggleMode} checked={mode === 'dark'} defaultChecked={mode === 'dark'} /> <Switch checkedChildren="紧凑" unCheckedChildren="正常" onChange={toggleCompact} checked={compact} defaultChecked={compact} /> </> );}; ``` 用新的`Theme`组件替换换来demo中导出的`Theme`包装布局组件,并通过`useAntdAlgorithm`生成主题算法。然后在页面中加上`Setting`组件 ``` // src/app/demo/layout.tsx'use client';import Theme from '../_components/theme';import { useAntdAlgorithm } from '../_components/theme/hooks';// ...const DemoAntd: FC<PropsWithChildren> = ({ children }) => { // ... const algorithm = useAntdAlgorithm(); return ( <ConfigProvider locale={antdLocaleData} theme={{ algorithm, // ... }} > {/* ... */} </ConfigProvider> );};const DemoLayout: FC<PropsWithChildren> = ({ children }) => ( <LayoutStore> <AntdRegistry> <Locale> <Theme> <DemoAntd>{children}</DemoAntd> </Theme> </Locale> </AntdRegistry> </LayoutStore>);export default DemoLayout; ``` 添加一个演示,并加入页面中查看效果 ``` // src/app/_components/theme/demo.tsx'use client';import type { FC } from 'react';import { Calendar } from 'antd';import $styles from '../../demo/_components/style.module.css';import { AntdThemeSetting } from './setting';const ThemeDemo: FC = () => ( <div className={$styles.container}> <h2 className="text-center">Setting Demo</h2> <div className="flex flex-col items-center"> <div className="mb-5 flex-auto"> <AntdThemeSetting /> </div> <div className="max-w-md"> <Calendar fullscreen={false} /> </div> </div> </div>);export default ThemeDemo;// src/app/demo/page.tsx// ...const DemoPage: FC = () => ( <div className={$styles.demo}> {/* <ZustandDemo /> */}、 <ThemeDemo /> </div>);export default DemoPage; ``` 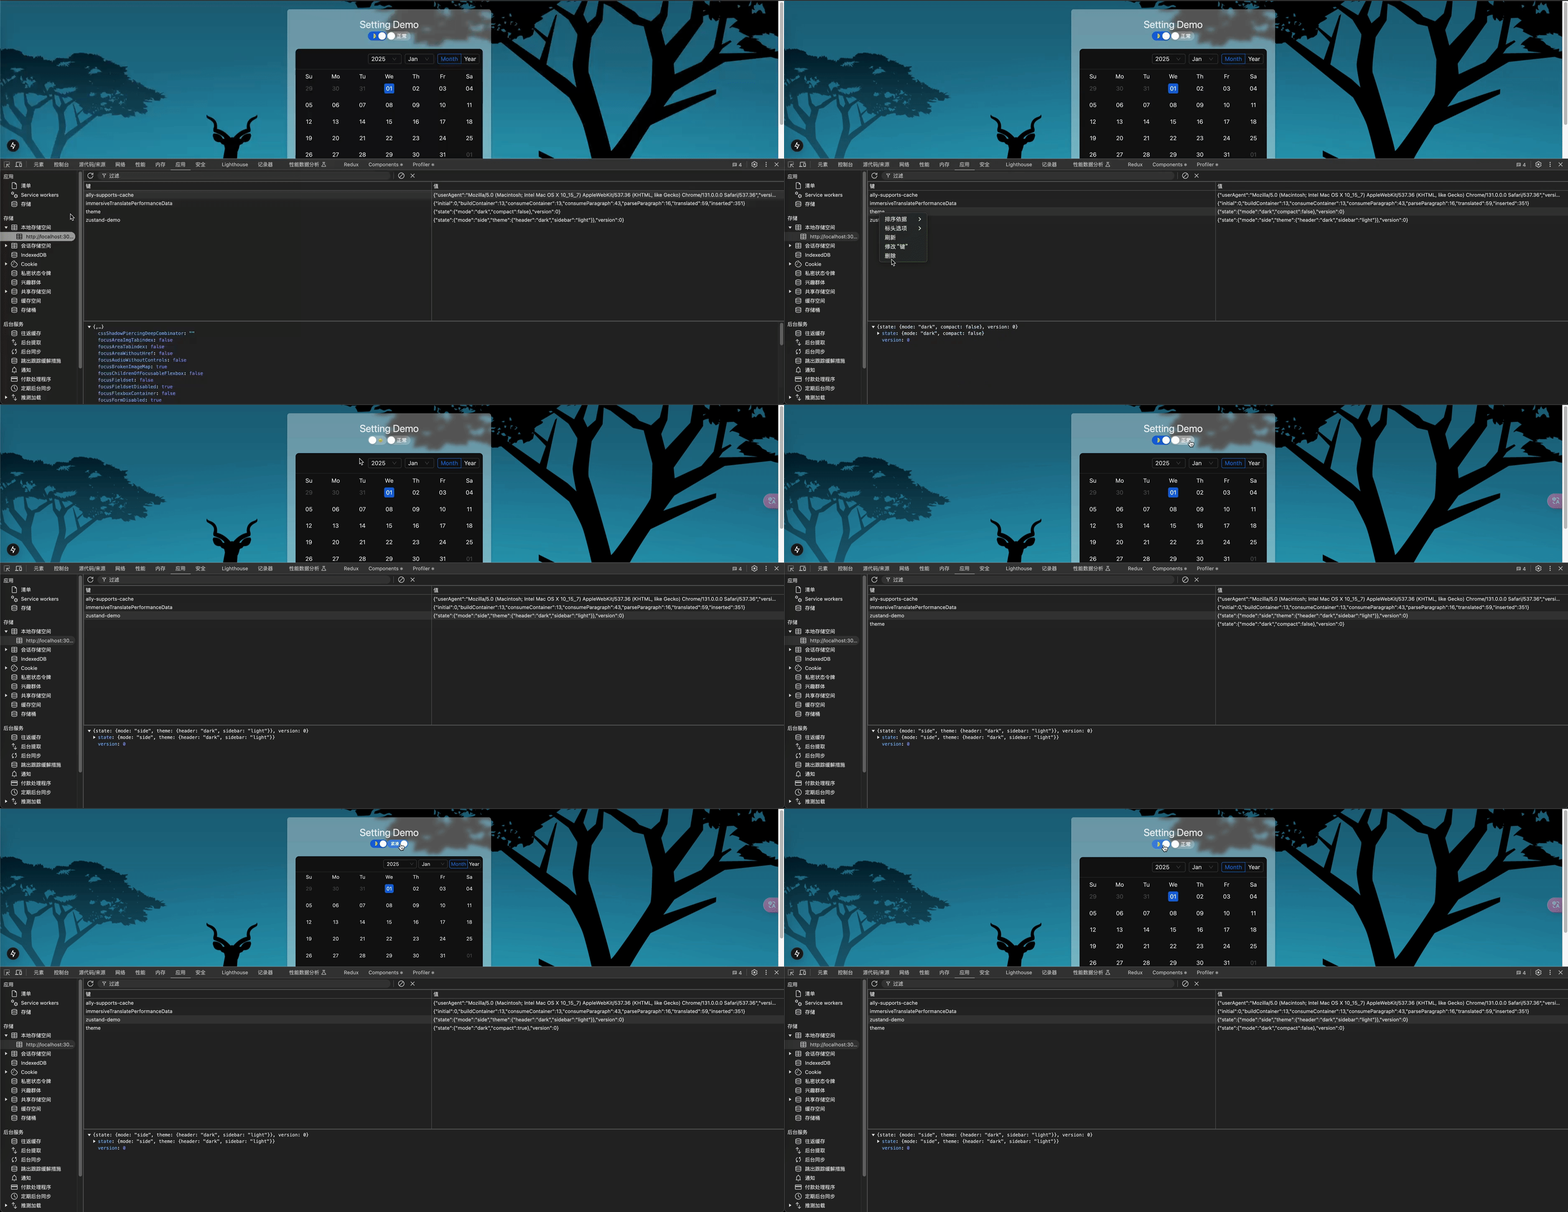 ### 切换Shadcn[](#切换shadcn "切换Shadcn的直接链接") 由于shadcn和tailwind的主题判断是一致的,我们都设定了通过`html`的`class`判断,所以非常简单 安装shadcn的`dropdown-menu`组件 ``` pnpm addsc dropdown-menu ``` 我们先修改一下前台页面的css ``` /* src/app/(pages)/layout.module.css */@reference "#tailwind.css";.layout { /* 设置全局背景图片 */ @apply min-h-full w-full flex p-0 m-0 flex-col justify-between bg-fixed bg-cover bg-no-repeat bg-center bg-[url(../styles/images/bg-light.png)];}html:global(.dark) .layout { @apply bg-[url(../styles/images/bg-dark.png)];} ``` 编写设置组件 请务必加上`modal={false}`,以防止点击下拉菜单页面变全屏 ``` // src/app/_components/theme/setting.tsx// ...import { Moon, Sun } from 'lucide-react';import { Button } from '../shadcn/ui/button';import { DropdownMenu, DropdownMenuContent, DropdownMenuItem, DropdownMenuTrigger,} from '../shadcn/ui/dropdown-menu';/** * Shadcn主题选择器 */export const ShadcnThemeSetting: FC = () => { const { changeMode } = useThemeActions(); return ( <DropdownMenu modal={false}> <DropdownMenuTrigger asChild> <Button variant="secondary" size="icon" className="focus-visible:!ring-0 focus-visible:border-[color:var(--border)]"> <Sun className="h-[1.2rem] w-[1.2rem] rotate-0 scale-100 transition-all dark:-rotate-90 dark:scale-0" /> <Moon className="absolute h-[1.2rem] w-[1.2rem] rotate-90 scale-0 transition-all dark:rotate-0 dark:scale-100" /> <span className="sr-only">Toggle theme</span> </Button> </DropdownMenuTrigger> <DropdownMenuContent align="end"> <DropdownMenuItem onClick={() => changeMode('light')}>Light</DropdownMenuItem> <DropdownMenuItem onClick={() => changeMode('dark')}>Dark</DropdownMenuItem> <DropdownMenuItem onClick={() => changeMode('system')}>System</DropdownMenuItem> </DropdownMenuContent> </DropdownMenu> );}; ``` 在布局的`Header`中导入组件 ``` // src/app/_components/header/index.tsx// ...import $styles from './styles.module.css';export const Header: FC = () => ( <header className={$styles.header}> <HeaderLogo /> <div className="mt-5"> <ShadcnThemeSetting /> </div> </header>); ``` 修改一下`Header`的样式 ``` /* src/app/_components/header/styles.module.css */@reference "#tailwind.css";.header { @apply flex items-center pt-6 max-h-24 flex-auto flex-col mb-3;} ``` 最后,用新的`Theme`组件包装布局 ``` // src/app/(pages)/layout.tsx// ...import Theme from '../_components/theme';const AppLayout: FC<PropsWithChildren> = ({ children }) => ( <Theme> <div className={$styles.layout}> <Header /> {children} </div> </Theme>);export default AppLayout; ``` 看一下效果 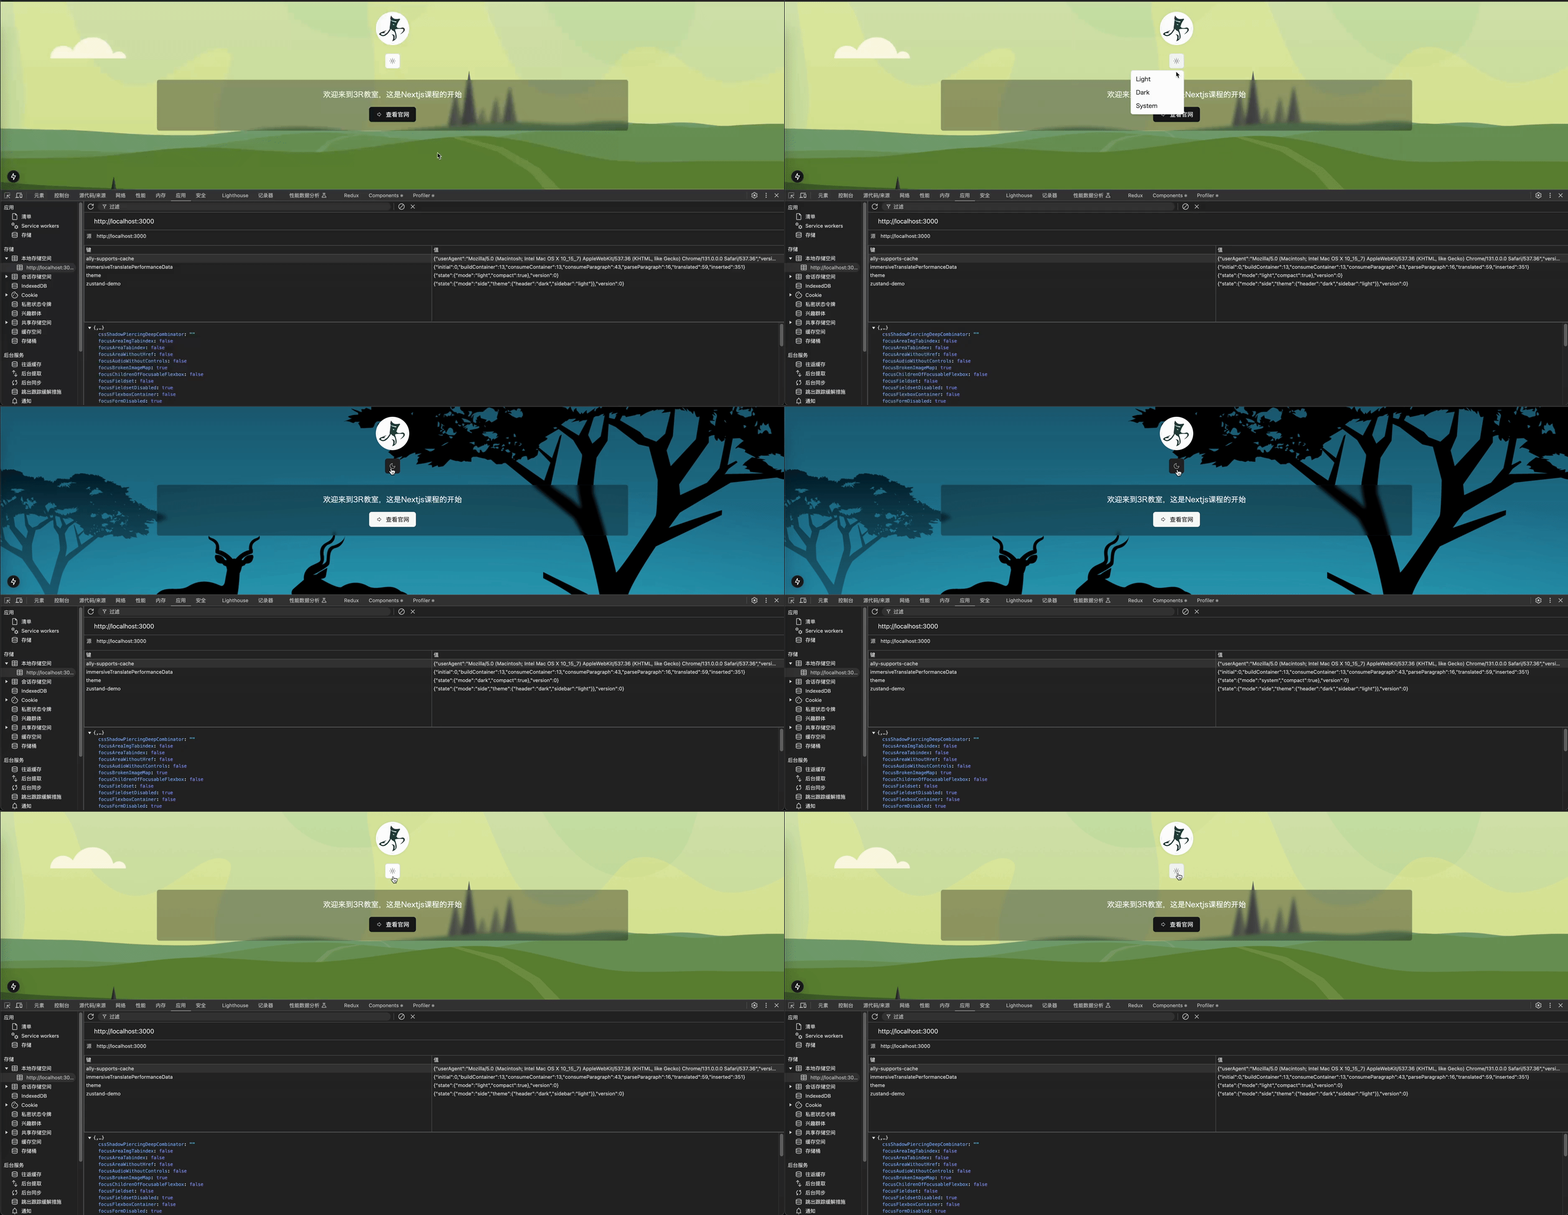 ### 其它说明[](#其它说明 "其它说明的直接链接") 如果不需要使用antd,那么,直接使用[next-themes](https://github.com/pacocoursey/next-themes)也是个不错的选择。但这个工具不大灵活,我们结合zustand自己写出来就更加容易把控了,也能更深入的学习react状态管理的一些相关知识!
peipeo
2026年11月8日 11:06
转发文档
收藏文档
上一篇
下一篇
手机扫码
复制链接
手机扫一扫转发分享
复制链接
Markdown文件
PDF文档(打印)
分享
链接
类型
密码
更新密码