剪藏
Rethinking your position
Learn how to learn
3R编码 | nestjs最佳实践 - 课程概览
3R编码 | Node.js开发环境搭建
3R编码 | Nestjs+Eslint+SWC应用初始化及断点调试
3R编码 | 装饰器与反射
3R编码 | Nestjs核心概念
3R编码 | 无懈可击的Linux服务器构建
3R编码 | 使用Turborepo+pnpm workspaces构建monorepo应用
3R编码 | 使用Gitea+Drone自建CICD平台
3R编码 | 整合Typeorm实现CRUD
3R编码 | 请求数据的验证和响应数据的序列化
3R编码 | 数据关联与树形嵌套结构的分类和评论的实现
3R编码 | 自定义全局的验证管道,拦截器和过滤器
3R编码 | 自定义数据验证约束及约束中的依赖注入
3R编码 | 批量操作及软删除(回收站)功能使用
3R编码 | 数据库与MeiliSearch的全文搜索
3R编码 | 数据操作代码的抽象化
3R编码 | 整合bun与pm2实现开发环境与生产环境免编译和自启
3R编码 | 自建配置系统实现
3R编码 | 嵌套路由与Swagger文档实现
3R编码 | 使用Yargs构建命令行工具
3R编码 | 生产环境下静默启动以及PM2 API的使用
3R编码 | 数据迁移功能的实现
3R编码 | 数据填充命令实现
3R编码 | 用户模块开发以及使用Passport实现JWT认证和无痛刷新
3R编码 | 基于CASL的RBAC动态角色及权限系统实现
3R编码 | 模型动态关联与基于CASL的动态权限的实现
3R编码 | 使用BullMQ实现异步验证短信与邮件发送
3R编码 | WebSocket实现消息广播功能
3R编码 | chapter27
3R编码 | chapter28
3R编码 | TS全栈+AI开发实战 - 课程概览
3R编码 | Node.js环境搭建及应用初始化
3R编码 | Next.js应用初始化
3R编码 | React内置Hooks的使用与自定义详解
3R编码 | Next.js中使用Zustand进行状态管理详解
3R编码 | Next.js核心概念及应用构建
微电子学第1话 MOS Differential Pair (I)
微电子学第1话 MOS Differential Pair (I)
微电子学第3话 CMRR
微电子学第2话 MOS Differential Pair (II)
终于有人讲了,凭什么三极管能放大?
降低人类负担:类型系统即边界
固态变压器SST是什么
本站点使用 MrDoc 构建
-
+
3R编码 | 整合bun与pm2实现开发环境与生产环境免编译和自启
提示 注意: 本节课只适用于\*nix系统(linux,mac,wsl等),如果你在纯windows(非wsl)学习本课程,则直接略过本节课 注意 本节课为实验性功能,代码仓库[在此](https://git.3rcd.com/classroom/nestjs-start-with-bun)。由于本节的代码太过复杂,兴趣类学习即可(建议略过),不提供问答,请自行研究 #### 预先阅读[](#预先阅读 "预先阅读的直接链接") 在学习本节课之前你需要阅读以下文档 - [pm2文档](https://pm2.keymetrics.io/docs/usage/pm2-api/) - [bun文档](https://bun.sh/) #### 依赖解析[](#依赖解析 "依赖解析的直接链接") - `pm2`是一个在生产环境下运行后台静默运行node或者其他应用的工具 - `ora`可以在命令行运行耗时任务时出现一个雪碧图 - `chokidar`是一个node文件监控器,当文件改变时可以进行一些操作 ``` pnpm add pm2 ora@5 chokidar ``` 修改`PanicOption`类型,添加一个`Ora`类型,用于传入雪碧动画的实例 ``` // src/modules/core/types.ts/** * 控制台错误函数panic的选项参数 */export interface PanicOption { /** * 报错消息 */ message?: string; /** * ora对象 */ spinner?: Ora; /** * 抛出的异常信息 */ error?: any; /** * 是否退出进程 */ exit?: boolean;} ``` 启动命令实现以下几种方案 - 使用bun直接运行TS源码 - 使用node运行编译后的JS - 通过pm2调用bun,在生产环境下静默直接运行TS源码 - 通过pm2调用node,在生产环境下静默运行编译后的JS 同时,我们还需要添加上以下两个功能 - 在运行时获取`nest-cli.json`的swagger插件配置(如果有的话),然后根据注释自动生成swagger字段注释,因为与swc一样,bun也没有ts类型检查 - 在运行时获取`nest-cli.json`的配置(如果有的话),按配置来实现对`assets`目录的文件更改监控以重启应用 ### 正常启动[](#正常启动 "正常启动的直接链接") 首先我们来实现以下两个功能 - 使用Bun直接启动TS源码 - 使用Node启动编译后的JS #### 类型[](#类型 "类型的直接链接") 在Typescript中使用bun需要把它的类型放到`tsconfig.json`中,同时为了避免jest测试代码报错,把jest的类型也放进去 ``` { "compilerOptions": { // ... "types": ["bun-types", "@types/jest"] } // ...} ``` 运行配置 - `options`包含了读取的`tsconfig.json`以及`nest-cli.json`两个文件的配置内容 - `paths`分别指定了命令的执行路径,应用编译路径,应用源码路径,编译用的`main.js`启动文件路径,源码启动文件`main.ts`路径,bun和nest cli的bin可执行文件路径 - `subprocess`用于分别设置bun和node的子进程选项 ``` // src/modules/core/commands/types.ts/* eslint-disable import/no-extraneous-dependencies */import { SpawnOptions as NodeSpawnOptions } from 'child_process';import { Configuration as NestCLIConfig } from '@nestjs/cli/lib/configuration';import type { SpawnOptions as BunSpawnOptions } from 'bun';import ts from 'typescript';export interface CLIConfig { options: { ts: ts.CompilerOptions; nest: NestCLIConfig; }; paths: Record<'cwd' | 'dist' | 'src' | 'js' | 'ts' | 'bun' | 'nest', string>; subprocess: { bun: BunSpawnOptions.OptionsObject; node: NodeSpawnOptions; };} ``` 命令参数 `nestConfig`: nest-cli.json的文件路径(相对于当前运行目录) `tsConfig`: 用于编译和运行的tsconfig.build.json的文件路径(相对于当前运行目录) `entry`: 使用直接运行TS文件的入口文件,默认为`main.ts`. 如果是运行js文件,则通过nest-cli.json的entryFile指定 `prod`: 是否使用PM2后台静默启动生产环境 `typescript`: 使用直接运行TS文件,这个配置只针对生产环境下是否通过 `watch`: 是否监控,所有环境都可以使用(但在非PM2启动的生产环境下此选项无效) `debug`: 是否开启debug模式,只对非生产环境有效 `restart`: 是否重启应用(PM2进程) ``` // src/modules/core/commands/types.tsexport type StartCommandArguments = { nestConfig?: string; tsConfig?: string; entry?: string; prod?: boolean; typescript?: boolean; watch?: boolean; debug?: boolean | string; restart?: boolean;}; ``` #### 命令结构[](#命令结构 "命令结构的直接链接") 命令结构中的字段意义,与`StartCommandArguments`中的字段类型大致相同,不再重复解释 ``` // src/modules/core/commands/start.command.tsexport const createStartCommand: CommandItem<any, StartCommandArguments> = async (app) => ({ command: ['start', 's'], describe: 'Start app', builder: { nestConfig: { type: 'string', alias: 'n', describe: 'nest cli config file path.', default: 'nest-cli.json', }, tsConfig: { type: 'string', alias: 't', describe: 'typescript config file path.', default: 'tsconfig.build.json', }, entry: { type: 'string', alias: 'e', describe: 'Specify entry file for ts runner, you can specify js entry file in nest-cli.json by entryFile.', default: 'main.ts', }, prod: { type: 'boolean', alias: 'p', describe: 'Start app in production by pm2.', default: false, }, restart: { type: 'boolean', alias: 'r', describe: 'Retart app(only pm2),pm2 will auto run start if process not exists.', default: false, }, typescript: { type: 'boolean', alias: 'ts', describe: 'Run the .ts file directly.', default: true, }, watch: { type: 'boolean', alias: 'w', describe: ' Run in watch mode (live-reload).', default: false, }, debug: { type: 'boolean', alias: 'd', describe: 'Whether to enable debug mode, only valid for non-production environments', default: false, }, }, handler: async (args: Arguments<StartCommandArguments>) => { // 此处编写命令处理器 },}); ``` #### 执行路径[](#执行路径 "执行路径的直接链接") 把执行路径支持为应用的根目录(即`src`或`dist`的上一层目录) ``` // src/modules/core/commands/helpers/config.ts/** * 执行路径(应用根目录) */const cwdPath = resolve(__dirname, '../../../../..'); ``` #### 启动配置[](#启动配置 "启动配置的直接链接") 该函数用于生成`CLIConfig`类型对应的运行配置 传入三个参数 - `tsConfigFile`是相对于根目录的TS编译配置文件(默认为`tsconfig.build.json`)的文件名或路径 - `nestConfigFile`是相对于根目录的`nest-cli.json`的文件名或路径 - `tsEntryFile`是相对于根目录的源码启动文件(默认为`main.ts`)的文件名或路径(编译后的`main.js`文件由`nest-cli.json`)指定 ``` // src/modules/core/commands/helpers/config.ts/* eslint-disable import/no-extraneous-dependencies */import { Configuration as NestCLIConfig } from '@nestjs/cli/lib/configuration';import ts from 'typescript';export const getCLIConfig = ( tsConfigFile: string, nestConfigFile: string, tsEntryFile?: string,): CLIConfig => { let tsConfig: ts.CompilerOptions = {}; const tsConfigPath = join(cwdPath, tsConfigFile); if (!existsSync(tsConfigPath)) panic(`ts config file '${tsConfigPath}' not exists!`); try { const allTsConfig = JSON.parse(readFileSync(tsConfigPath, 'utf-8')); tsConfig = get(allTsConfig, 'compilerOptions', {}); } catch (error) { panic({ error }); } let nestConfig: NestCLIConfig = {}; const nestConfigPath = join(cwdPath, nestConfigFile); if (!existsSync(nestConfigPath)) panic(`nest cli config file '${nestConfigPath}' not exists!`); try { nestConfig = JSON.parse(readFileSync(nestConfigPath, 'utf-8')); } catch (error) { panic({ error }); } const dist = get(tsConfig, 'outDir', 'dist'); const src = get(nestConfig, 'sourceRoot', 'src'); const paths = { cwd: cwdPath, dist, src, js: join(dist, nestConfig.entryFile ?? 'main.js'), ts: join(src, tsEntryFile ?? 'main.ts'), bun: './node_modules/bun/bin/bun', nest: './node_modules/@nestjs/cli/bin/nest.js', }; return { options: { ts: tsConfig, nest: nestConfig, }, paths, subprocess: { bun: { cwd: cwdPath, stdout: 'inherit', env: process.env, onExit: (proc) => { proc.kill(); if (!isNil(proc.exitCode)) exit(0); }, }, node: { cwd: cwdPath, env: process.env, stdio: 'inherit', }, }, };}; ``` #### 启动函数[](#启动函数 "启动函数的直接链接") 该函数用于通过bun直接启动应用的ts源码,并且支持监控和debug ``` // src/modules/core/commands/helpers/start.tsexport const start = async (args: Arguments<StartCommandArguments>, config: CLIConfig) => { const script = args.typescript ? config.paths.ts : config.paths.js; const params = [config.paths.bun, 'run']; if (args.watch) params.push('--watch'); if (args.debug) { const inspectFlag = typeof args.debug === 'string' ? `--inspect=${args.debug}` : '--inspect'; params.push(inspectFlag); } params.push(script); let child: Subprocess; if (args.watch) { const restart = () => { if (!isNil(child)) child.kill(); child = Bun.spawn(params, config.subprocess.bun); }; restart(); } else { Bun.spawn(params, { ...config.subprocess.bun, onExit(proc) { proc.kill(); process.exit(0); }, }); }}; ``` ### PM2启动[](#pm2启动 "PM2启动的直接链接") 我们加入了pm2以支持在生产环境下的静默启动 #### 类型[](#类型-1 "类型的直接链接") 修改`AppConfig`,这样就可以在`config/app.config.ts`自定义一些pm2的配置了 ``` // src/modules/core/commands/types.tsimport { StartOptions } from 'pm2';export interface AppConfig { ... /** * PM2配置 */ pm2?: Omit<StartOptions, 'name' | 'cwd' | 'script' | 'args' | 'interpreter' | 'watch'>;} ``` 选项参数 启动命令中的pm2的选项类型 信息 `command`为启动命令,默认为`start`,即使用pm2去运行前面的正常启动的`start`命令 ``` // src/modules/core/commands/types.tsexport type Pm2Option = Pick<StartCommandArguments, 'typescript' | 'watch'> & { command: string;}; ``` #### PM2配置[](#pm2配置 "PM2配置的直接链接") 合并在`app.config.ts`中配置的自定义pm2选项和默认pm2选项 ``` // src/modules/core/commands/helpers/config.tsexport const getPm2Config = async ( configure: Configure, option: Pm2Option, config: CLIConfig, script: string,): Promise<StartOptions> => { const { name, pm2: customConfig = {} } = await configure.get<AppConfig>('app'); const defaultConfig: StartOptions = { name, cwd: cwdPath, script, args: option.command, autorestart: true, watch: option.watch, ignore_watch: ['node_modules'], env: process.env, exec_mode: 'fork', interpreter: config.paths.bun, }; return deepMerge( defaultConfig, omit(customConfig, ['name', 'cwd', 'script', 'args', 'watch', 'interpreter']), 'replace', );}; ``` #### 启动函数[](#启动函数-1 "启动函数的直接链接") 使用pm2启动应用时,其执行逻辑为 1. 获取pm2的配置 2. 如果是`cluster`模式其直接运行ts源码,则自动切换为`fork`(因为无法在`cluster`下使用bun直接运行ts源码) 3. 尝试连接pm2,连接失败则退出进程 4. 如果是`start`,则启动应用,启动失败退出进程 5. 如果是`restart`,则重启应用,如果应用没有被启动则正常启动应用,启动失败退出进程 ``` // src/modules/core/commands/helpers/start.tsexport const startPM2 = async ( configure: Configure, args: Arguments<StartCommandArguments>, config: CLIConfig,) => { const { name } = await configure.get<AppConfig>('app'); const script = args.typescript ? config.paths.ts : config.paths.js; const pm2Config = await getPm2Config( configure, { command: 'start', ...pick(args, ['watch', 'typescript']), }, config, script, ); if (pm2Config.exec_mode === 'cluster' && args.typescript) { console.log( chalk.yellowBright( 'Cannot directly use bun to run ts code in cluster mode, so it will automatically change to fork mode.', ), ); console.log(); console.log( chalk.bgCyanBright( chalk.blackBright( 'If you really need the app to be started in cluster mode, be sure to compile it into js first, and then add the --no-ts arg when running', ), ), ); console.log(); pm2Config.exec_mode = 'fork'; } const connectCallback = (error?: any) => { if (!isNil(error)) { console.error(error); process.exit(2); } }; const startCallback = (error?: any) => { if (!isNil(error)) { console.error(error); exit(1); } pm2.disconnect(); }; const restartCallback = (error?: any) => { if (!isNil(error)) { pm2.start(pm2Config, (serr) => startCallback(serr)); } else { pm2.disconnect(); } }; pm2.connect((cerr) => { connectCallback(cerr); args.restart ? pm2.restart(name, restartCallback) : pm2.start(pm2Config, (serr) => startCallback(serr)); });}; ``` ### 处理器[](#处理器 "处理器的直接链接") 如果是静默启动或重启应用则使用PM2启动,请他情况使用正常方式启动 ``` // src/modules/core/commands/start.command.tsexport const createStartCommand: CommandItem<any, StartCommandArguments> = async (app) => ({ ... handler: async (args: Arguments<StartCommandArguments>) => { const { configure } = app; const config = getCLIConfig(args.tsConfig, args.nestConfig, args.entry); if (args.prod || args.restart) await startPM2(configure, args, config); else await start(args, config); },}); ``` ### 静态资源[](#静态资源 "静态资源的直接链接") Nest CLI的默认情况是可以监控静态文件的更改,通过nest-cli.json中的`compilerOptions`进行配置.cli是监控文件然后重启编译后js并复制静态文件. 而我们使用bun直接启动则无法直接使用nest cli去做这件事.所以我们需要查看cli的源码对assets的处理,并根据源码自行实现这个功能 #### Nest CLI配置[](#nest-cli配置 "Nest CLI配置的直接链接") 执行`mdkir src/assets`,并在nest-cli.json与官网说明的方式一样配置静态文件字段`assets` ``` { "$schema": "https://json.schemastore.org/nest-cli", "collection": "@nestjs/schematics", "sourceRoot": "src", "compilerOptions": { "assets": ["assets/**/*"], ... }} ``` #### 资源管理[](#资源管理 "资源管理的直接链接") 然后复制nest cli源码中的[`AssetManage`类](https://github.com/nestjs/nest-cli/blob/master/lib/compiler/assets-manager.ts),并按我们的需求进行一定的修改.其原理同样是使用`chokidar`去监控文件的改变,代码如下 信息 由于大部分代码与`AssetManage`类是一致的,所以请自行查看并研究.课程由于篇幅原因,对这部分代码就不过多解说了 ``` // src/modules/core/commands/helpers/asset.tsexport class Asset { private watchAssetsKeyValue: { [key: string]: boolean } = {}; private watchers: chokidar.FSWatcher[] = []; private actionInProgress = false; closeWatchers() { const timeoutMs = 500; const closeFn = () => { if (this.actionInProgress) { this.actionInProgress = false; setTimeout(closeFn, timeoutMs); } else { this.watchers.forEach((watcher) => watcher.close()); } }; setTimeout(closeFn, timeoutMs); } watchAssets(config: CLIConfig, codePath: string, changer: () => void) { const assets = get(config.options.nest, 'compilerOptions.assets', []) as AssetEntry[]; if (assets.length <= 0) { return; } try { const isWatchEnabled = toBoolean(get(config, 'watchAssets', 'src')); const filesToWatch = assets.map<AssetEntry>((item) => { if (typeof item === 'string') { return { glob: join(codePath, item), }; } return { glob: join(codePath, item.include!), exclude: item.exclude ? join(codePath, item.exclude) : undefined, flat: item.flat, // deprecated field watchAssets: item.watchAssets, }; }); for (const item of filesToWatch) { const option: ActionOnFile = { action: 'change', item, path: '', sourceRoot: codePath, watchAssetsMode: isWatchEnabled, }; const watcher = chokidar .watch(item.glob, { ignored: item.exclude }) .on('add', (path: string) => this.actionOnFile({ ...option, path, action: 'change' }, changer), ) .on('change', (path: string) => this.actionOnFile({ ...option, path, action: 'change' }, changer), ) .on('unlink', (path: string) => this.actionOnFile({ ...option, path, action: 'unlink' }, changer), ); this.watchers.push(watcher); } } catch (err) { throw new Error( `An error occurred during the assets copying process. ${(err as any).message}`, ); } } protected actionOnFile(option: ActionOnFile, changer: () => void) { const { action, item, path, watchAssetsMode } = option; const isWatchEnabled = watchAssetsMode || item.watchAssets; if (!isWatchEnabled && this.watchAssetsKeyValue[path]) { return; } this.watchAssetsKeyValue[path] = true; this.actionInProgress = true; if (action === 'change') changer(); }} ``` #### 监控资源[](#监控资源 "监控资源的直接链接") 下面我们可以更改一下`start`函数来对启动应用进行静态文件的监控设置 提示 由于pm2可以通过自定义配置(默认只排除了`node_modules`目录)来自行监控任何根目录下的文件,无需所以不需要做更改 ``` // src/modules/core/commands/helpers/start.tsexport const start = async (args: Arguments<StartCommandArguments>, config: CLIConfig) => { if (args.watch) { const asseter = new Asset(); const restart = () => { if (!isNil(child)) child.kill(); child = Bun.spawn(params, config.subprocess.bun); }; restart(); asseter.watchAssets(config, codePath, restart); process.on('exit', () => { child.kill(); asseter.closeWatchers(); process.exit(0); }); }}; ``` ### Swagger插件[](#swagger插件 "Swagger插件的直接链接") Nest CLI默认使用TSC进行编译,所以可以自动进行类型检测,也可以自动根据注释生成open api的字段文档. 但就像我们前面使用swagger编译启动一样,bun同样也不自带类型检测和swagger注释生成.不过,nest cli为swagger开发了类型检测以及自动生成文档的注释,只要通过nest-cli.json配置即可.而bun则需要我们自己去编写类似功能. 我们可以参考nest cli的源码,研究一下swagger是怎么实现的,然后复制它的代码进行一些魔改即可实现 提示 需要注意的是pm2无法在自动重启(监控文件改变而重启应用)时自动进行类型检测和生成swagger文档注释,因为它没有重启的hook,所以如果我们的应用运行在pm2下,请使用`restart`命令手动重启 #### 数据生成[](#数据生成 "数据生成的直接链接") 根据nest cli的[swagger插件源码](https://github.com/nestjs/nest-cli/blob/master/lib/compiler/swc/swc-compiler.ts)实现`generateSwaggerMetadata`函数.它可以根据`nest-cli.json`中的以下配置像swagger一样进行类型检测以及生成用于自动swagger字段类型生成的`metadata.ts`文件 ``` { "compilerOptions": { ... "typeCheck": true, "plugins": [ { "name": "@nestjs/swagger", "options": { "introspectComments": true, "controllerKeyOfComment": "summary" } } ] }} ``` 具体实现如下 信息 由于大部分代码与nest cli源码中的swagger插件实现方式是一致的,所以请自行查看并研究.课程由于篇幅原因,对这部分代码就不过多解说了 ``` // src/modules/core/commands/helpers/swagger.ts/* eslint-disable import/no-extraneous-dependencies */import { join } from 'path';import { PluginMetadataGenerator } from '@nestjs/cli/lib/compiler/plugins';import { ReadonlyVisitor } from '@nestjs/swagger/dist/plugin';import { PluginOptions } from '@nestjs/swagger/dist/plugin/merge-options';import { get, isNil } from 'lodash';import { Arguments } from 'yargs';import { CLIConfig, StartCommandArguments } from '../types';export const generateSwaggerMetadata = ( args: Arguments<StartCommandArguments>, config: CLIConfig, watch: boolean,) => { const cliPlugins = get(config.options.nest, 'compilerOptions.plugins', []) as ( | string | RecordAny )[]; const swaggerPlugin = cliPlugins.find( (item) => item === '@nestjs/swagger' || (item as any).name === '@nestjs/swagger', ); if (!isNil(swaggerPlugin) && args.typescript) { const srcPath = join(config.paths.cwd, config.paths.src); const generator = new PluginMetadataGenerator(); let swaggerPluginOption: PluginOptions = {}; if (typeof swaggerPlugin !== 'string' && 'options' in swaggerPlugin) { swaggerPluginOption = swaggerPlugin.options; } generator.generate({ visitors: [new ReadonlyVisitor({ ...swaggerPluginOption, pathToSource: srcPath })], outputDir: srcPath, watch, tsconfigPath: args.tsConfig, printDiagnostics: false, }); }}; ``` #### 使用插件[](#使用插件 "使用插件的直接链接") 在正常启动、重启以及PM2启动和重启之前调用该函数进行类型检测与swagger注释生成 ``` // src/modules/core/commands/helpers/start.tsexport const start = async (args: Arguments<StartCommandArguments>, config: CLIConfig) => { ... if (args.watch) { if (args.typescript) generateSwaggerMetadata(args, config, false); ... } else { if (args.typescript) generateSwaggerMetadata(args, config, false); ... }};export const startPM2 = async ( configure: Configure, args: Arguments<StartCommandArguments>, config: CLIConfig,) => { ... pm2.connect((cerr) => { connectCallback(cerr); generateSwaggerMetadata(args, config, false); args.restart ? pm2.restart(name, restartCallback) : pm2.start(pm2Config, (serr) => startCallback(serr)); });}; ``` 编译命令其实写不写无所谓,本就是使用默认的nest cli编译.但是为了命令的完整性,我们也写进去 ### 类型[](#类型-2 "类型的直接链接") 编译命令有两个选项`watch`和`preserveWatchOutput`,分别用于开启编译时的监控以及是否在运行时置顶命令行(即`screen`) 提示 启动命令无法使用`preserveWatchOutput`,这是因为目前bun版本还不支持关闭screen,后续版本支持后再加上 ``` // src/modules/core/commands/types.tsexport type BuildCommandArguments = Pick<StartCommandArguments, 'tsConfig' | 'nestConfig'> & { watch?: string; preserveWatchOutput?: boolean;}; ``` ### 命令[](#命令 "命令的直接链接") 该命令的实现逻辑非常简单,即开一个bun子进程去调用nest cli进行编译即可 ``` // src/modules/core/commands/build.command.tsexport const createBuildCommand: CommandItem<any, BuildCommandArguments> = async (app) => ({ command: ['build', 'b'], describe: 'Build application by nest cli.', builder: { nestConfig: { type: 'string', alias: 'n', describe: 'nest cli config file path.', default: 'nest-cli.json', }, tsConfig: { type: 'string', alias: 't', describe: 'typescript config file path.', default: 'tsconfig.build.json', }, watch: { type: 'boolean', alias: 'w', describe: ' Run in watch mode (live-reload).', default: false, }, preserveWatchOutput: { type: 'boolean', alias: 'po', describe: 'Use "preserveWatchOutput" option when using tsc watch mode', default: false, }, }, handler: async (args: Arguments<BuildCommandArguments>) => { const config = getCLIConfig(args.tsConfig, args.nestConfig); const params = ['build', '-c', args.nestConfig, '-p', args.tsConfig]; if (args.watch) params.push('-w'); if (args.preserveWatchOutput) params.push('po'); const child = spawn(config.paths.nest, params, config.subprocess.node); child.on('exit', () => exit()); },});export * from './build.command'; ``` 下面我们来测试一下命令是否可用 ### 添加脚本[](#添加脚本 "添加脚本的直接链接") 为了便捷使用命令,我们在`package.json`中添加以下脚本 ``` { ... "scripts": { "cli": "bun --bun src/console/bin.ts", "dev": "cross-env NODE_ENV=development pnpm cli start -w", "prod": "cross-env NODE_ENV=production pnpm cli start -w -p", "prodjs": "cross-env NODE_ENV=production pnpm cli start -w -p --no-ts", "reload": "cross-env NODE_ENV=production pnpm cli start -r", "build": "cross-env NODE_ENV=production pnpm cli build", "start": "cross-env NODE_ENV=development nest start", "start:dev": "cross-env NODE_ENV=development nest start --watch", "start:debug": "cross-env NODE_ENV=development nest start --debug --watch", "start:prod": "cross-env NODE_ENV=production node dist/main" },} ``` ### 效果演示[](#效果演示 "效果演示的直接链接") 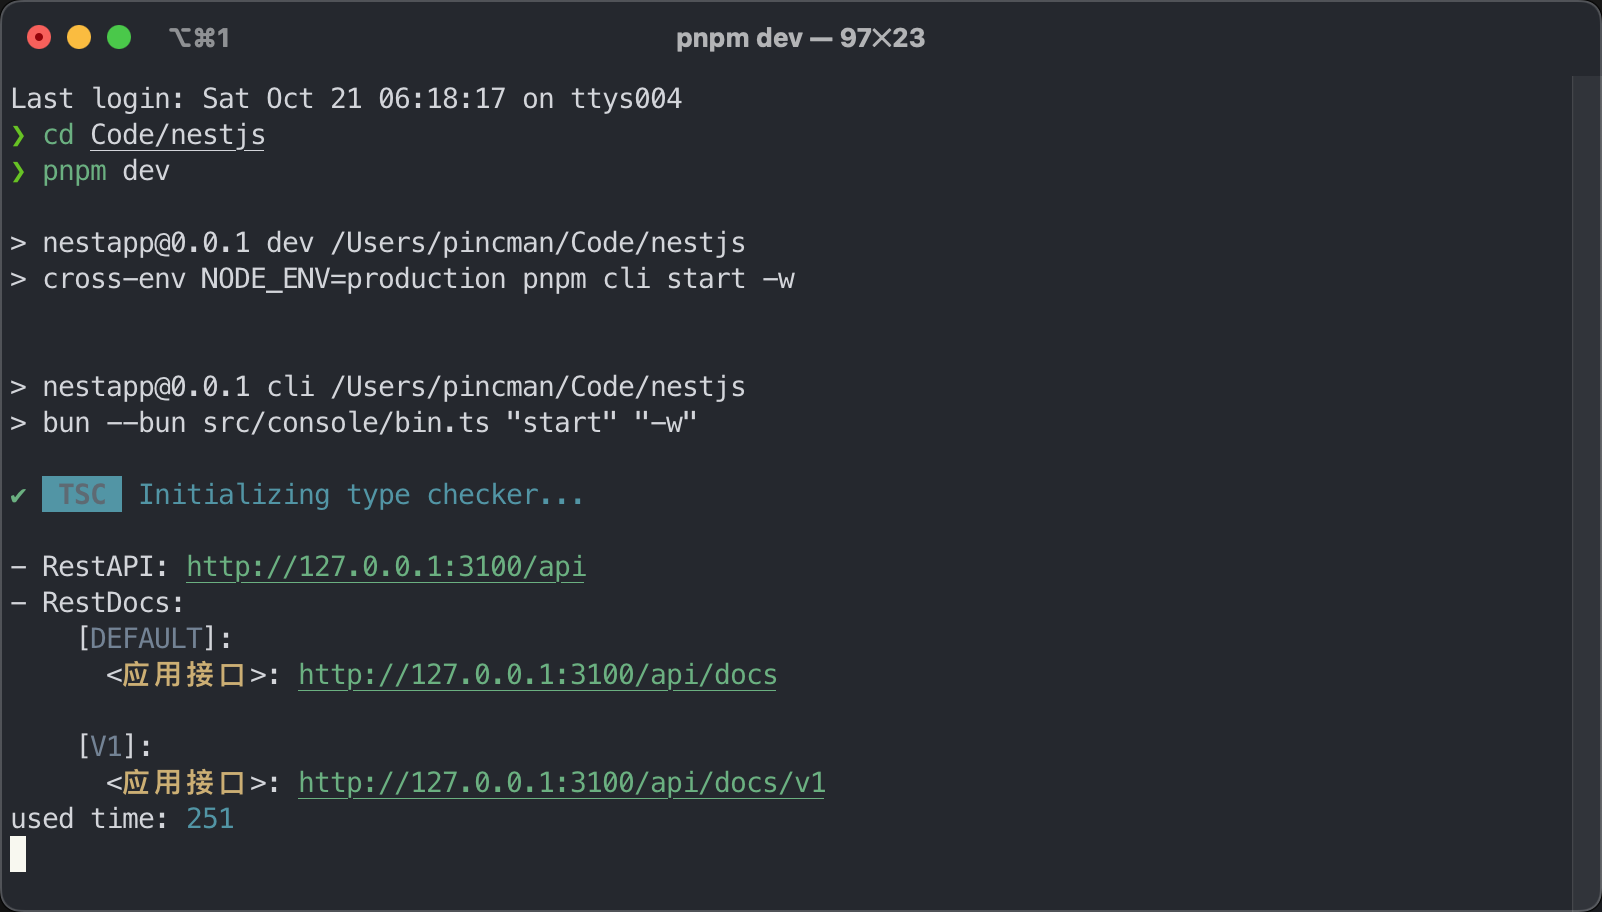 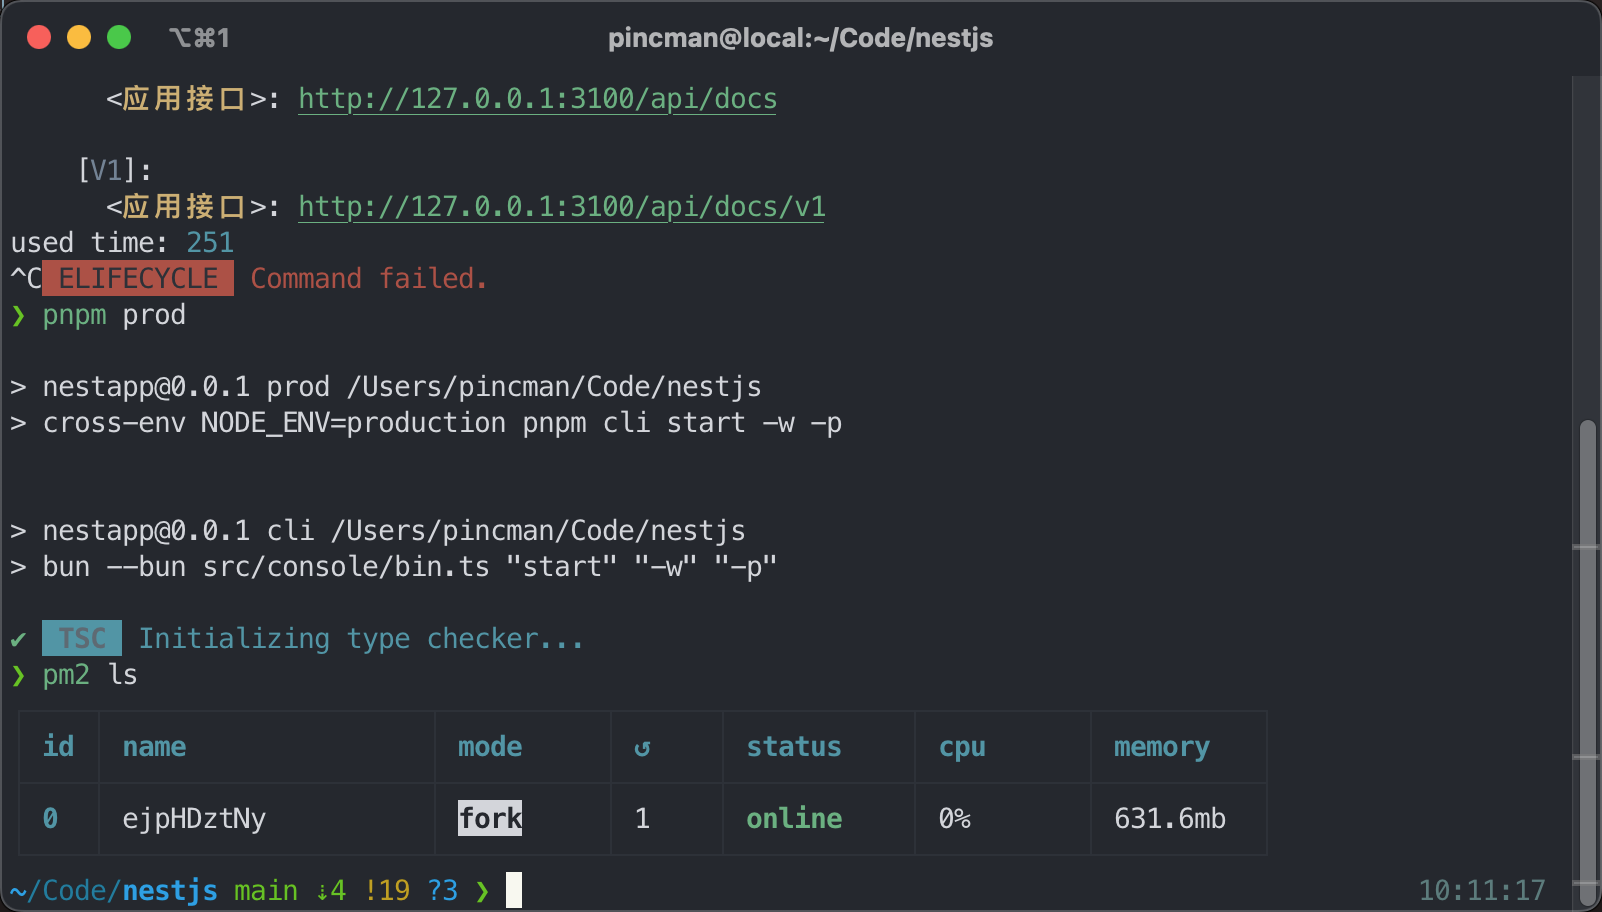 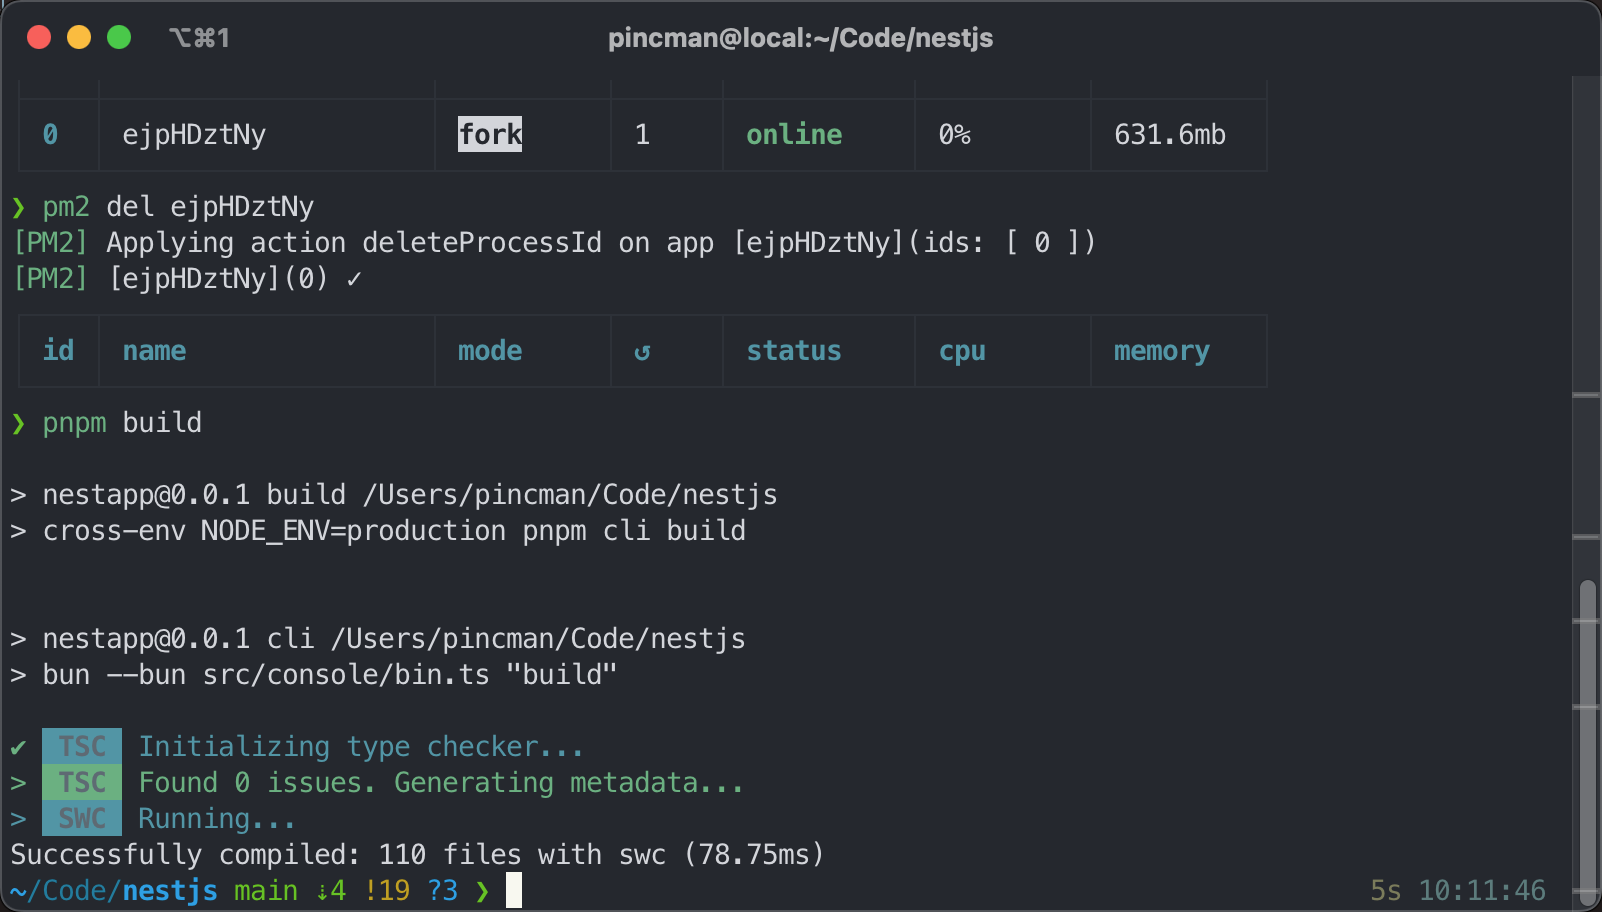
peipeo
2026年11月8日 10:33
转发文档
收藏文档
上一篇
下一篇
手机扫码
复制链接
手机扫一扫转发分享
复制链接
Markdown文件
PDF文档(打印)
分享
链接
类型
密码
更新密码